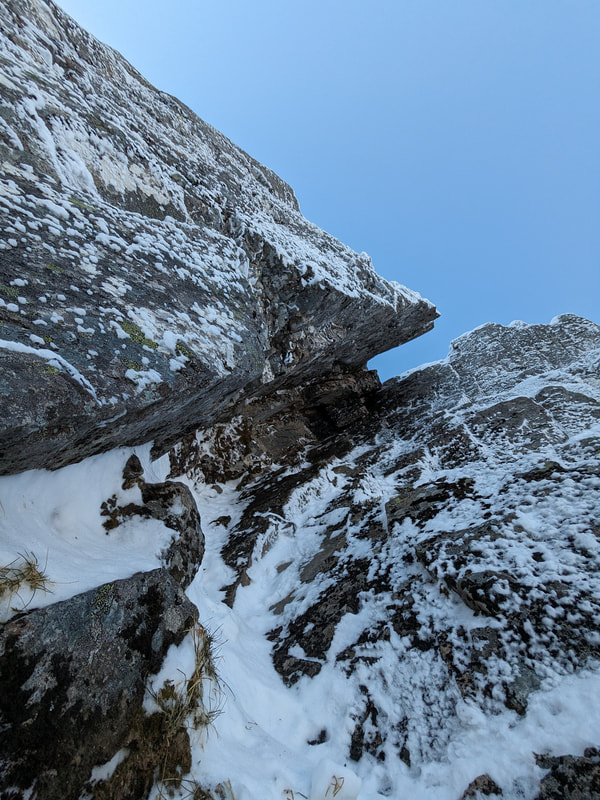
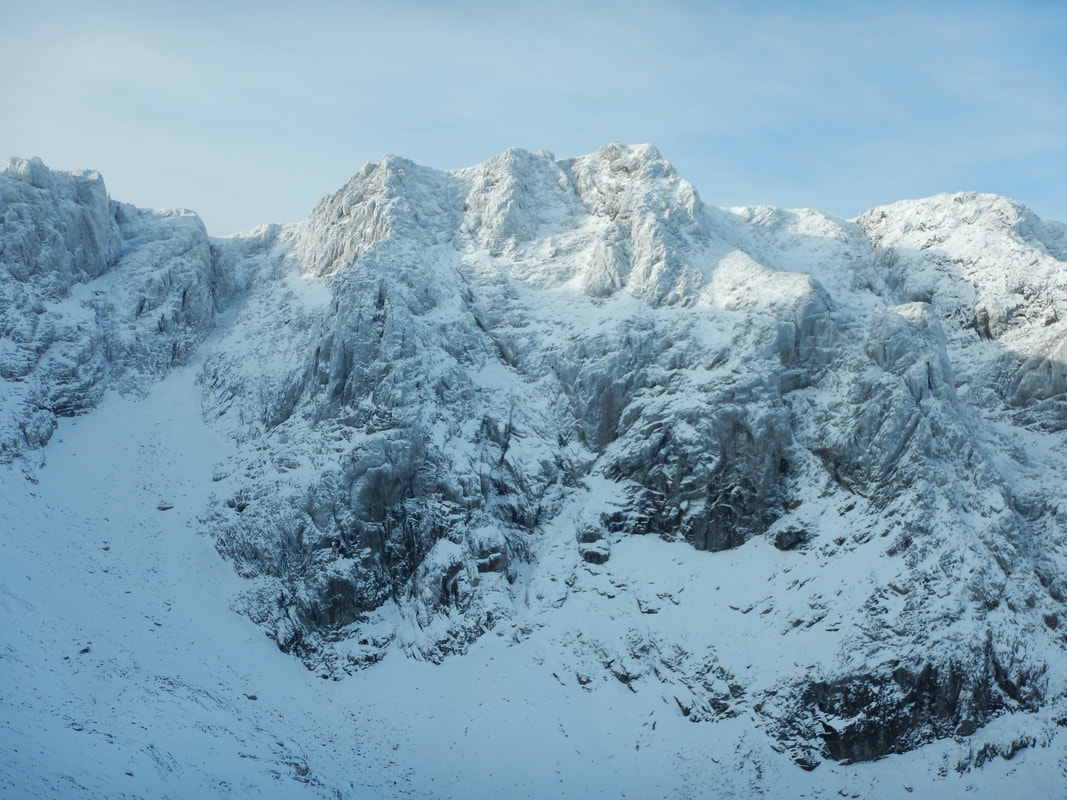
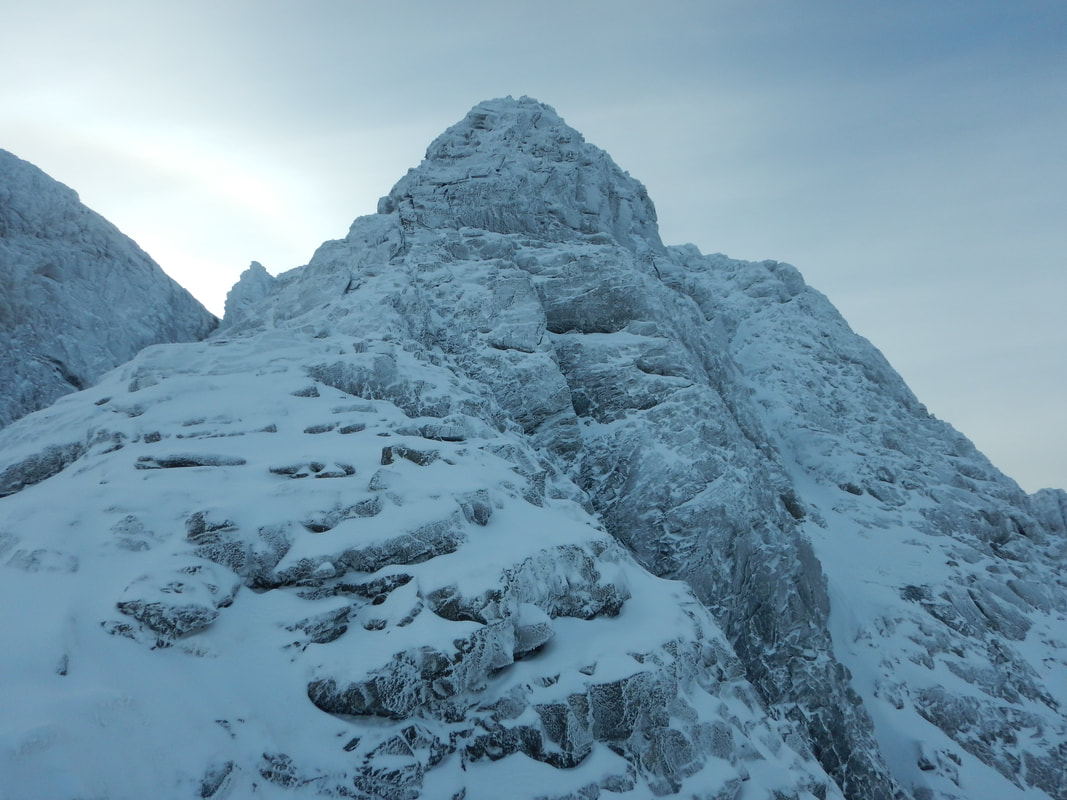
 Can I climb Ben Nevis in spring without a guide? Yes, but there are some skills and knowledge you need to do it safely. Even then, it can be really tough, and turning around before reaching the summit might be the best thing to do. Here is some guidance on what you need to know and the skills you need to climb Ben Nevis in winter without a guide. 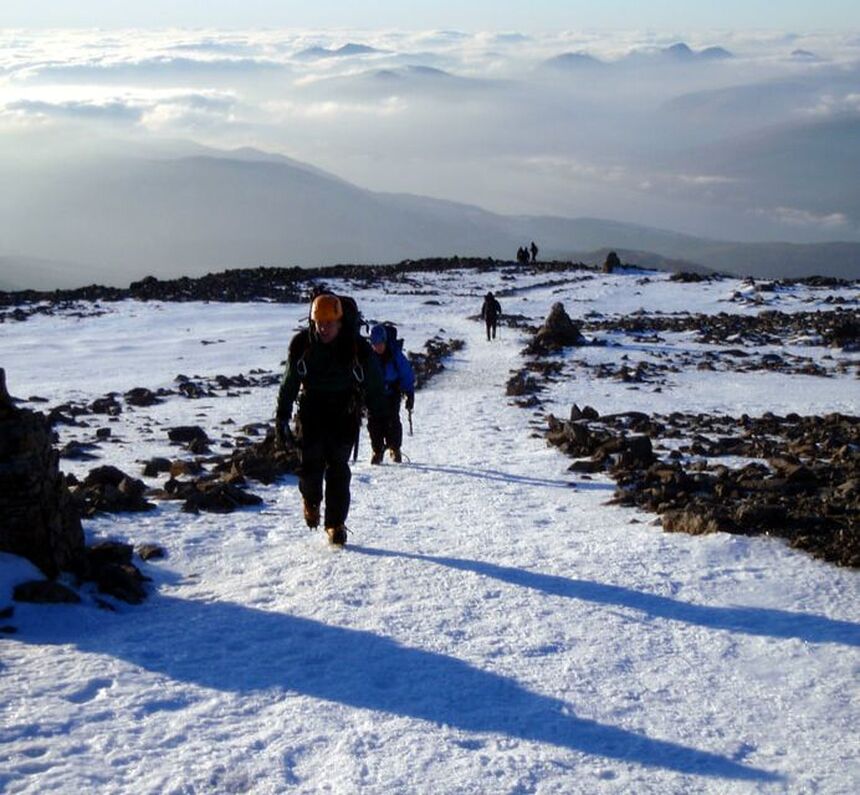 What you don’t know you don’t know. The mountain usually sees its first snowfall in September and it can be in winter condition all the way through to May. So don't be fooled by a warm, sunny April day down in Fort William, the top of the mountains could still be experiencing serious winter weather! Further south in England, it's very easy to forget that there is any snow anywhere at all. But the summit of Ben Nevis holds on to its winter conditions for much longer than most mountains in the UK because it is a long way north, it is very high and it can collect 2.5m depth of snow on the summit over the course of the winter. The summit is usually about 9℃ colder than the temperature at sea level. So, if it is 5℃ at sea level it will be about -4℃ on the summit. Add to this the extra chill of the wind blowing at 30mph to 40mph, and it will feel like -14℃. There is nearly always a wind blowing on the summit and it can be anything from 10mph to 130mph. 30mph to 40mph is common, making walking very hard work enough and enough to make you very cold; 50mph to 60mph happens quite a lot and is enough to blow you over or off the path; 70mph to 80mph will knock you flat. Snow conditions underfoot vary hugely with what the weather is doing at the time. The bottom half of the track is often clear of snow, with the snow line usually sitting between about 600m and 900m. From this point you should expect to be on snow all the way to the summit and back down. After a fresh dump of snow it will be very soft, but if the snow has been through some freeze-thaw cycles (meaning the temperature rises allowing the snow to go soggy, then the temperature drops again, freezing the soft soggy snow into snow-ice) it will be very hard and icy, so the walking will likely be easier but crampons and an ice axe will be essential. 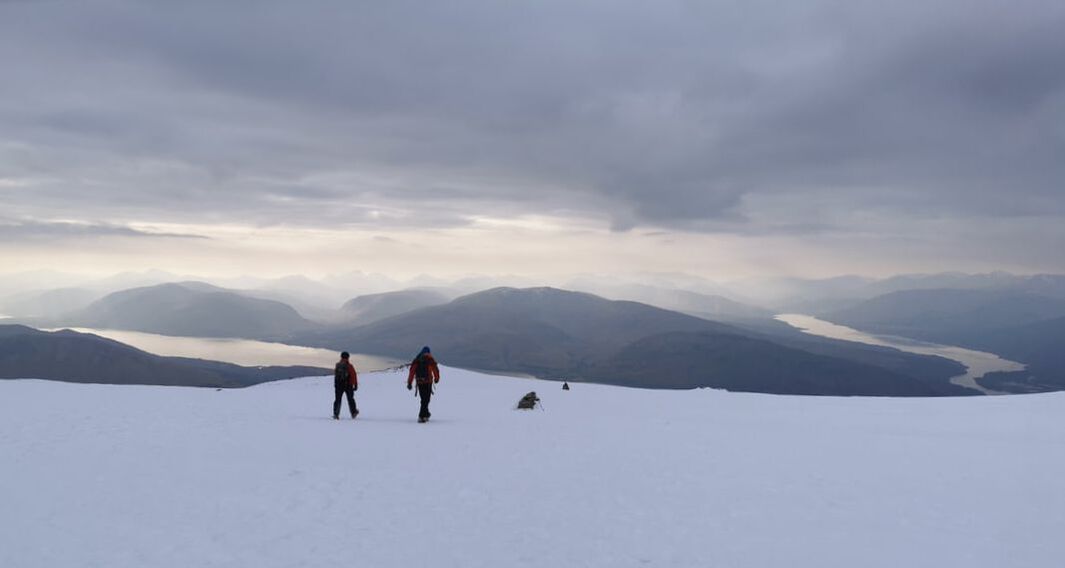 Essential Skills. You’re going to get wet. Probably you’ll get some rain or snow fall, and even if you don’t you’ll get wet through sweat. You need to know what to wear and what to carry with you, but just as importantly, you need to know how to use your gear to stay warm and comfortable. If you get wet you will get cold, and if you are cold you will not eat or drink properly, you will not want to think about navigation and you will not make good decisions. Staying warm and comfortable is an essential, under-rated winter skill. Once on the snow you need to be comfortable using your boots to kick steps if it is just small areas of hard snow, or confident walking in crampons on relatively steep ground. Make sure your crampons are correctly fitted to your boots before you set off - the side of a mountain in 40+ mph winds and swirling snow is not the place to be adjusting them. Crampons have a habit of catching on everything - rocks, trousers, your other crampon, you name it - so make sure you practice walking in them on easier ground first. You should also have your ice axe and know what to do with it. It can be used to provide support while you walk and also to stop a trip or slip from having dire consequences. It is common to walk off into the Red Burn in descent, either intentionally or by accident, where you might find very long stretches of steep snow. If the snow is hard and icy you will need an expert level of skills with crampons and an ice axe to descend by the Red Burn. It's best to stay on the Mountain Path and follow its zigzags. 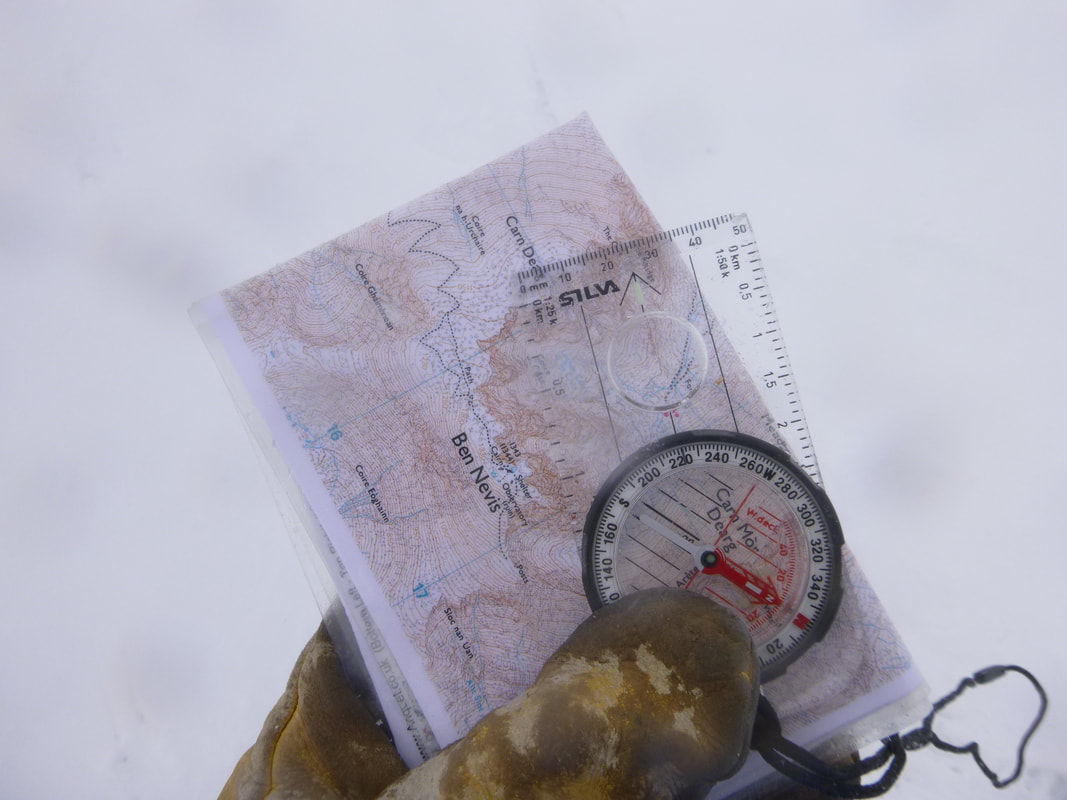 Navigation A clear summit on Ben Nevis is a rare thing so expect to be in cloud and that means your navigation needs to be on point, especially when there is snow on the ground. In summer there is a path to follow but in winter this gets completely buried in snow, and there can be little to no visible difference between the ground and sky. You need to know how to take a bearing from your map, and then be able to follow it accurately on varying terrain. Once on the huge and featureless summit plateau there are cairns to aid navigation but it is common to not be able to see from one cairn to the next, and in heavy snow winters some of them get completely buried. Here's more detailed advice about Navigation on Ben Nevis. You will still need to follow a bearing on your compass and know exactly when to make the left turn toward the summit. When you reach the summit remember that you're only half way there and you will then need to do everything in reverse, so stay switched on all the way down. In a white out, the only thing that will keep you from falling through the cornice is following your compass bearing accurately. Sometimes, turning back before you get into a very serious situation is the best thing to do. Come back on another day when the weather is better. 
0 Comments
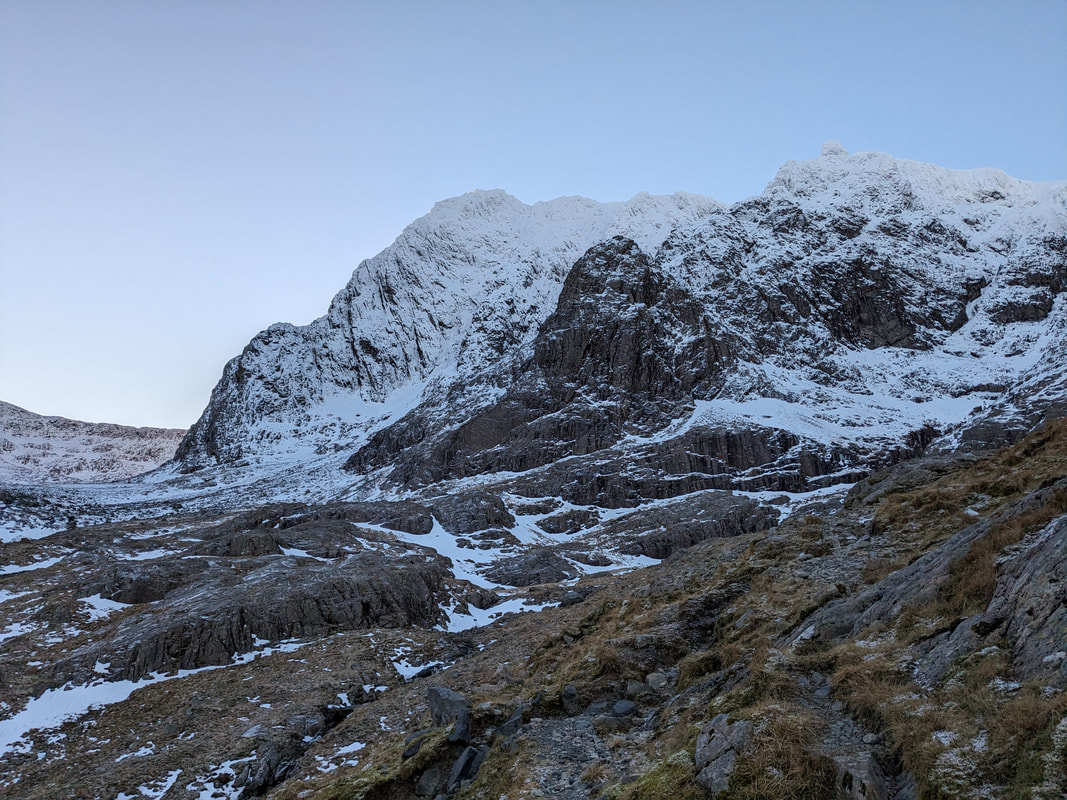
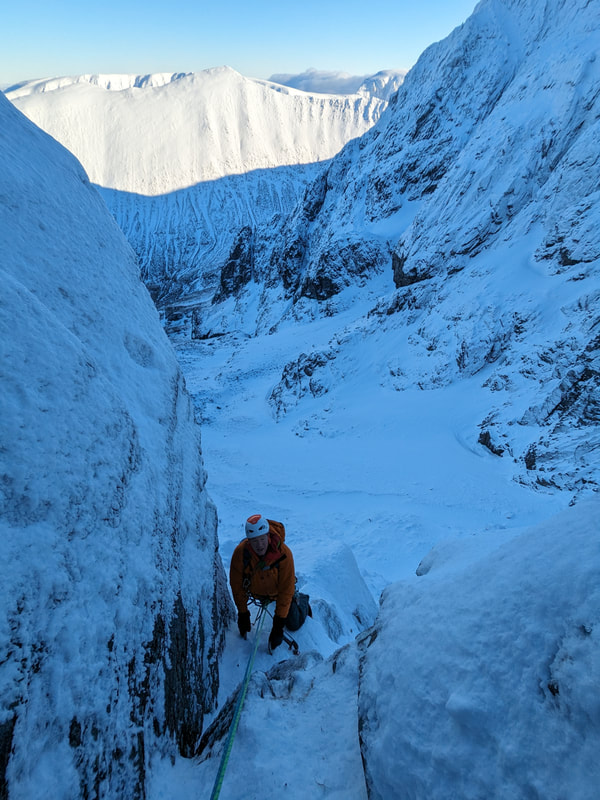
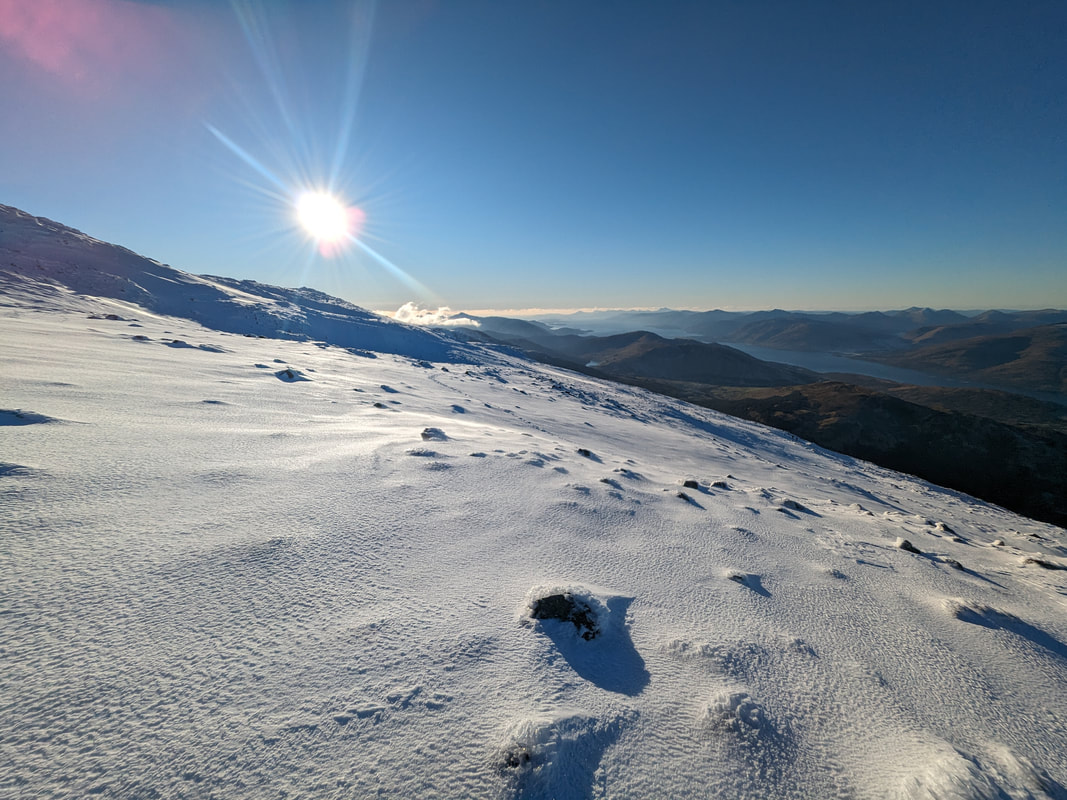
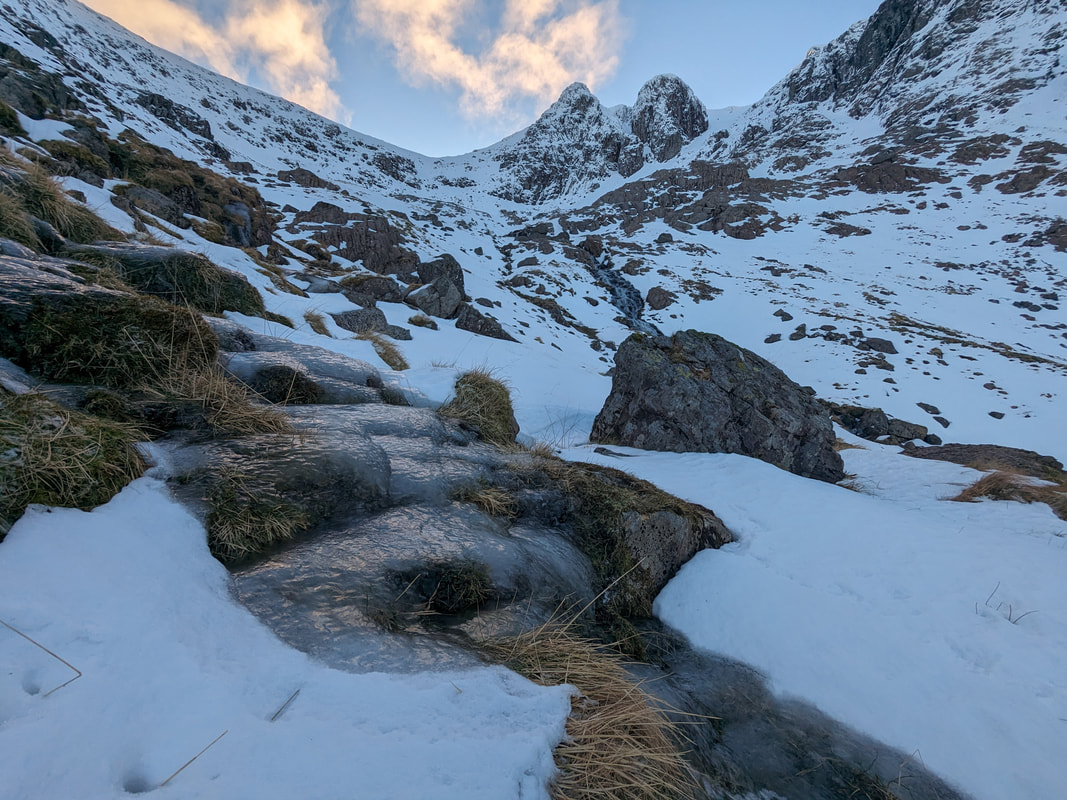
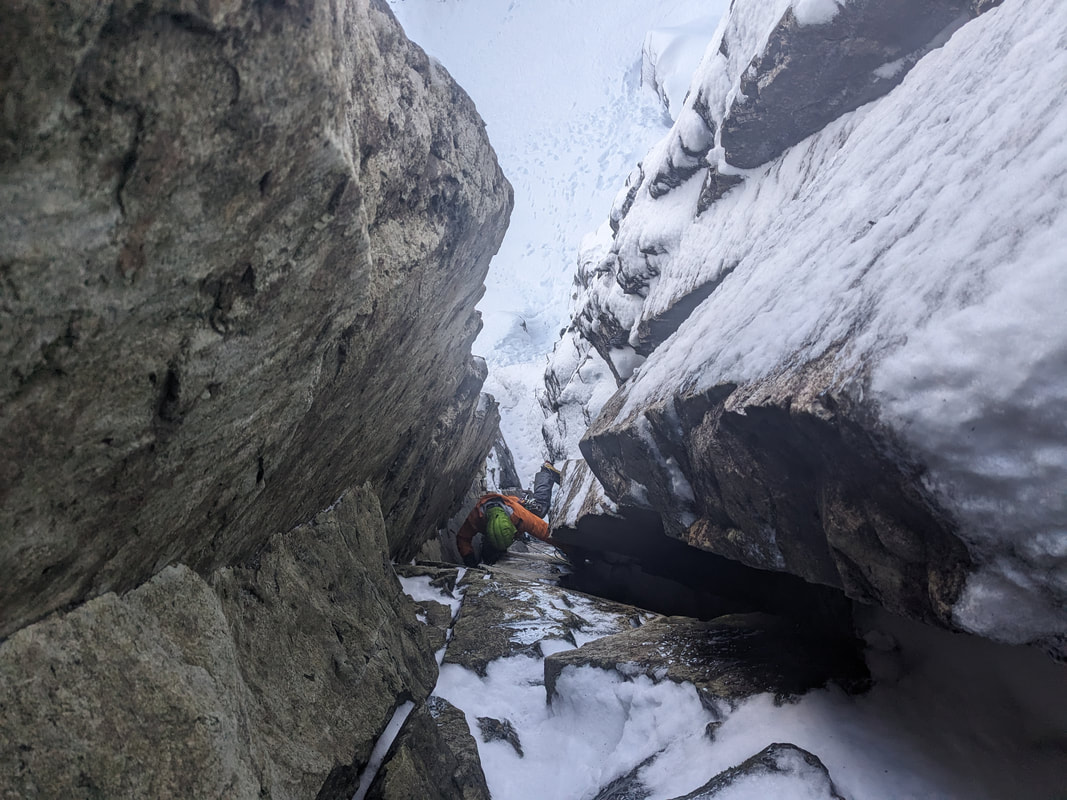
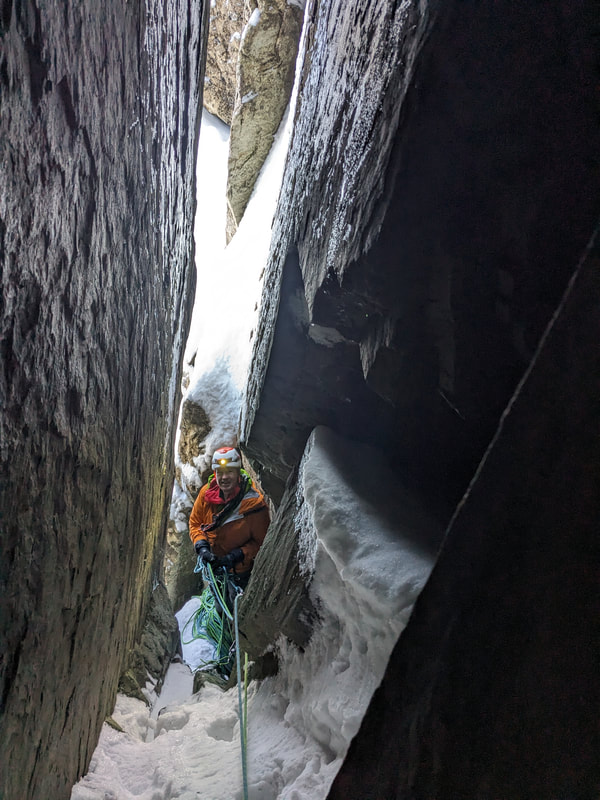
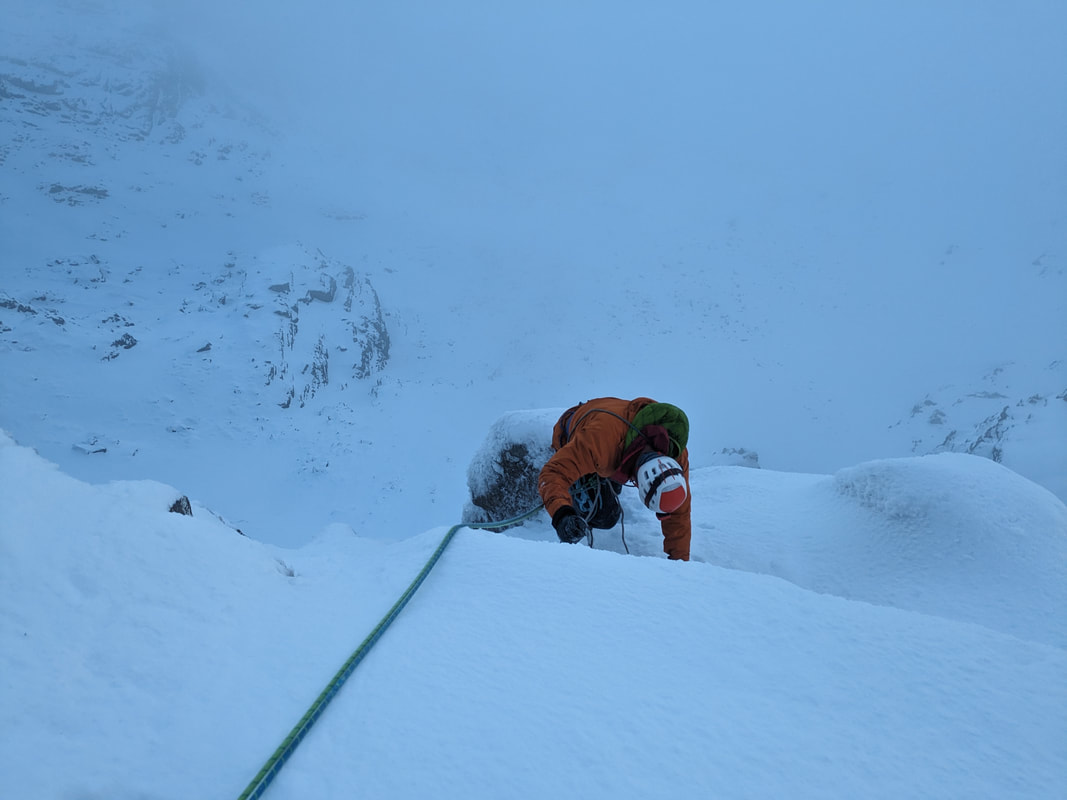
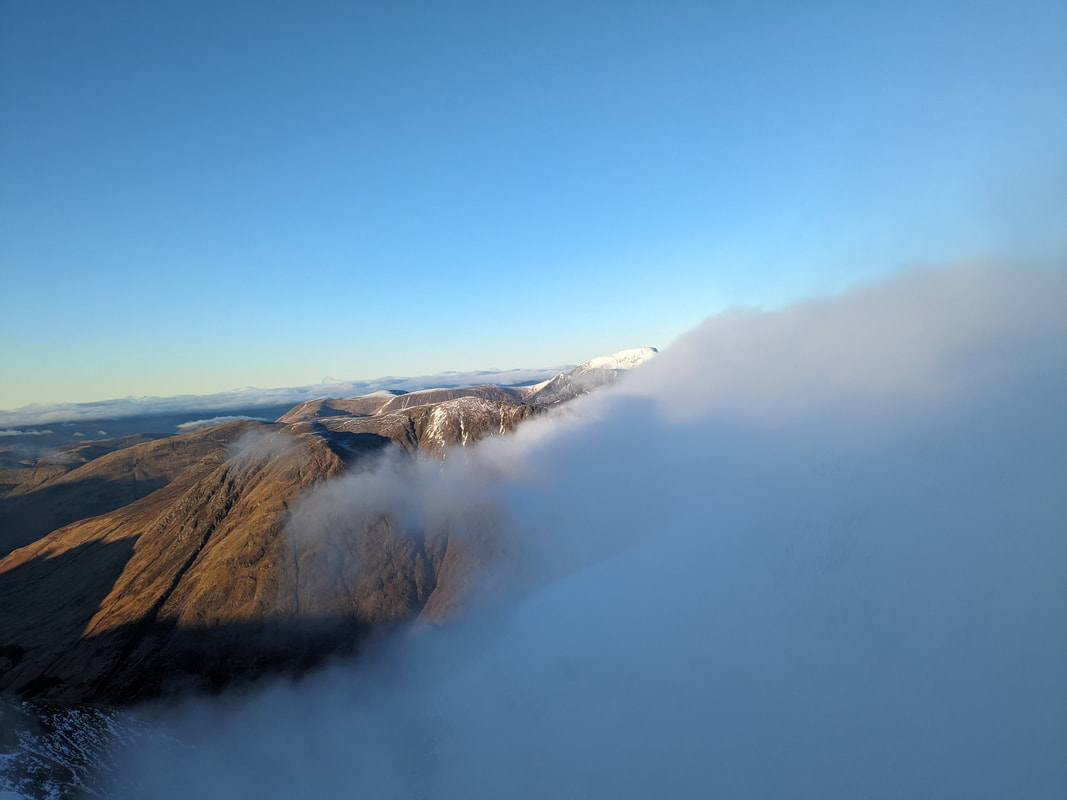
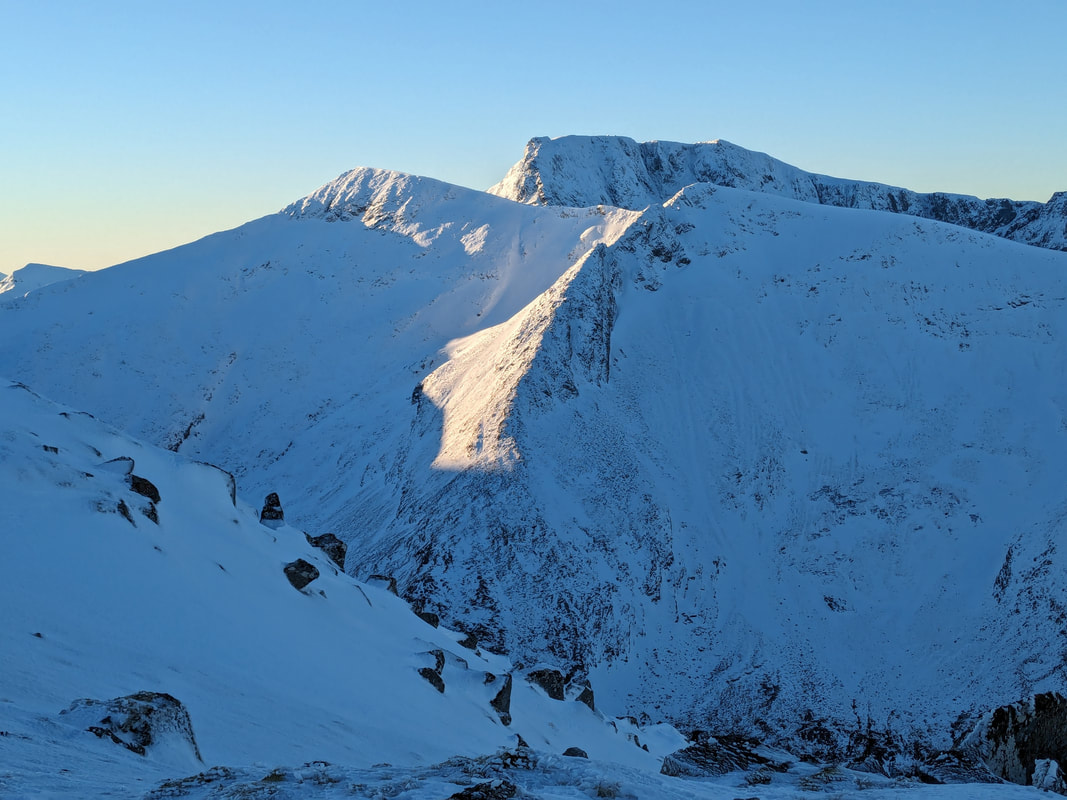
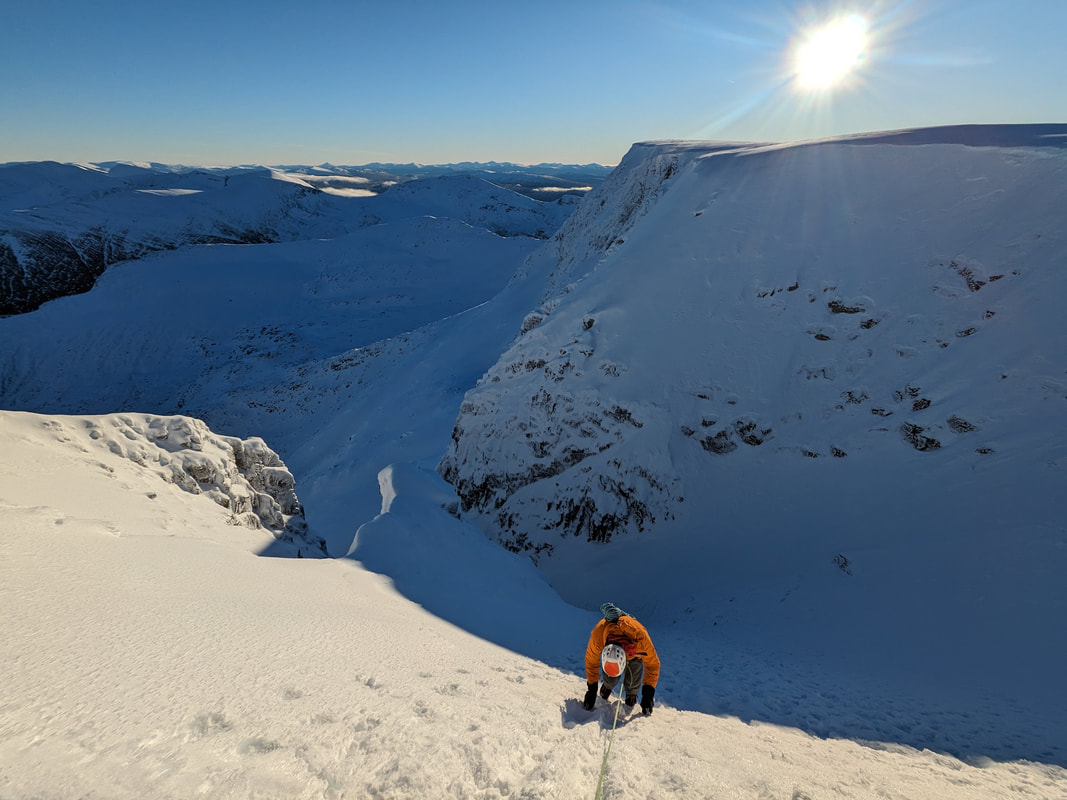
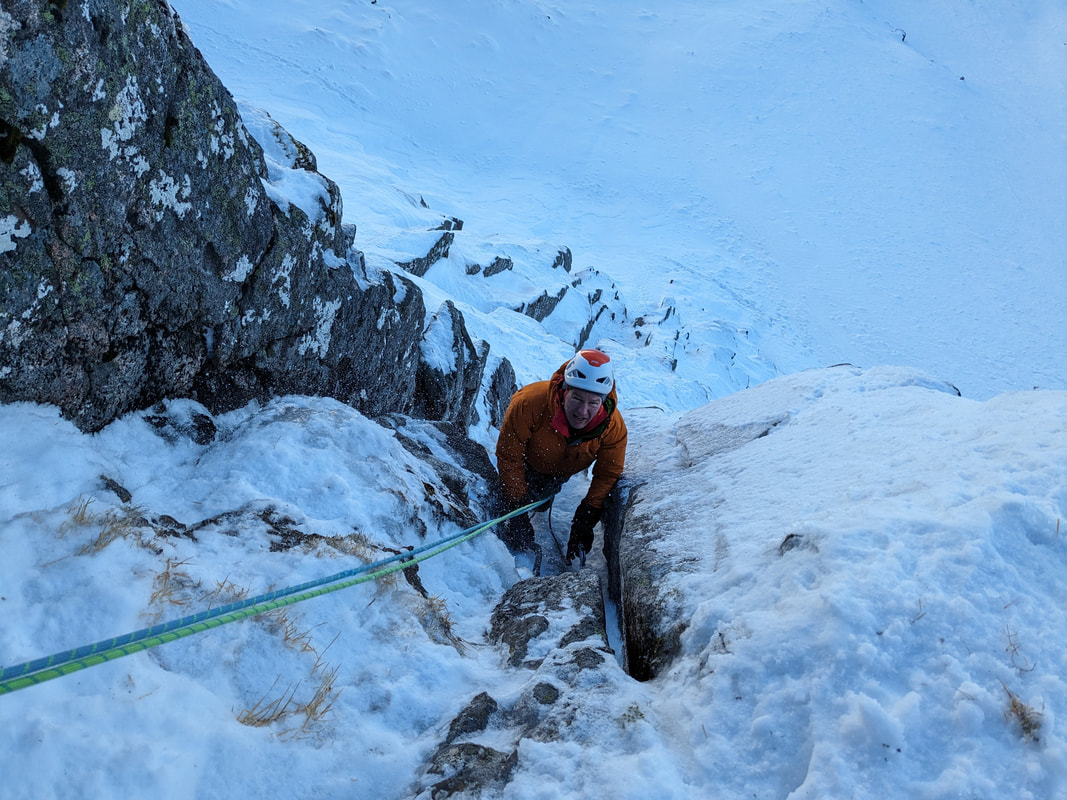
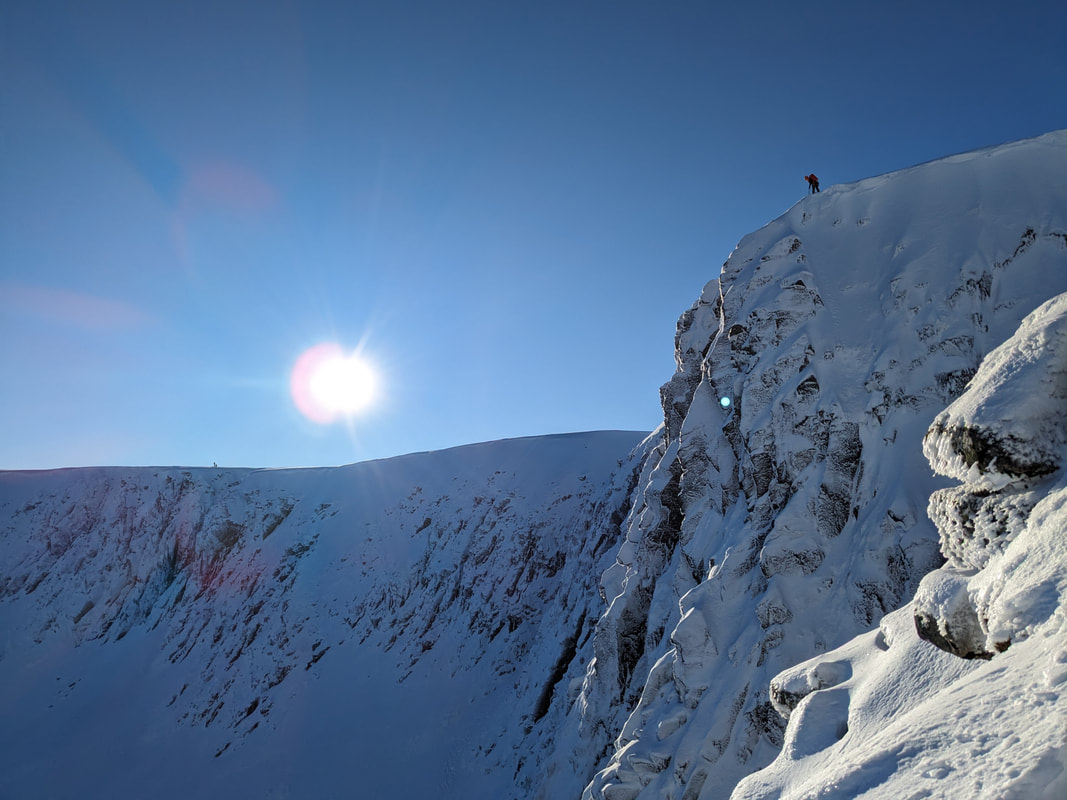
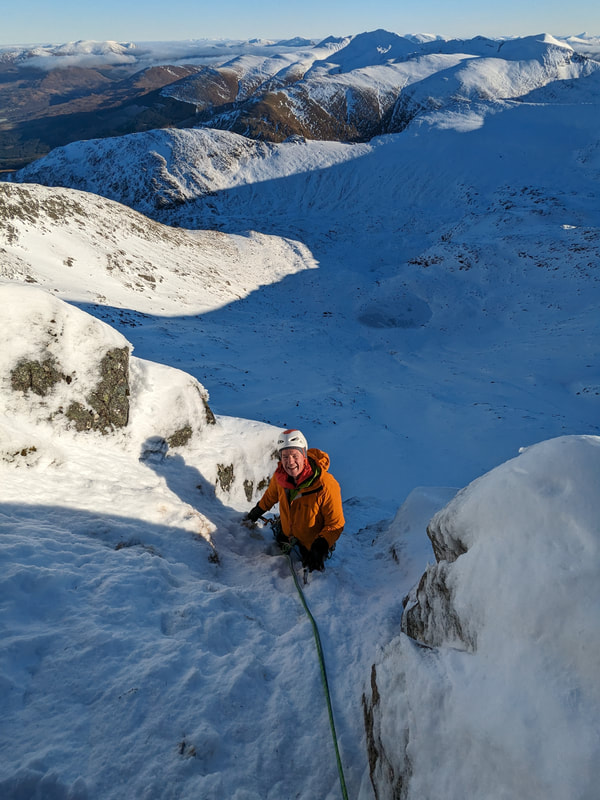
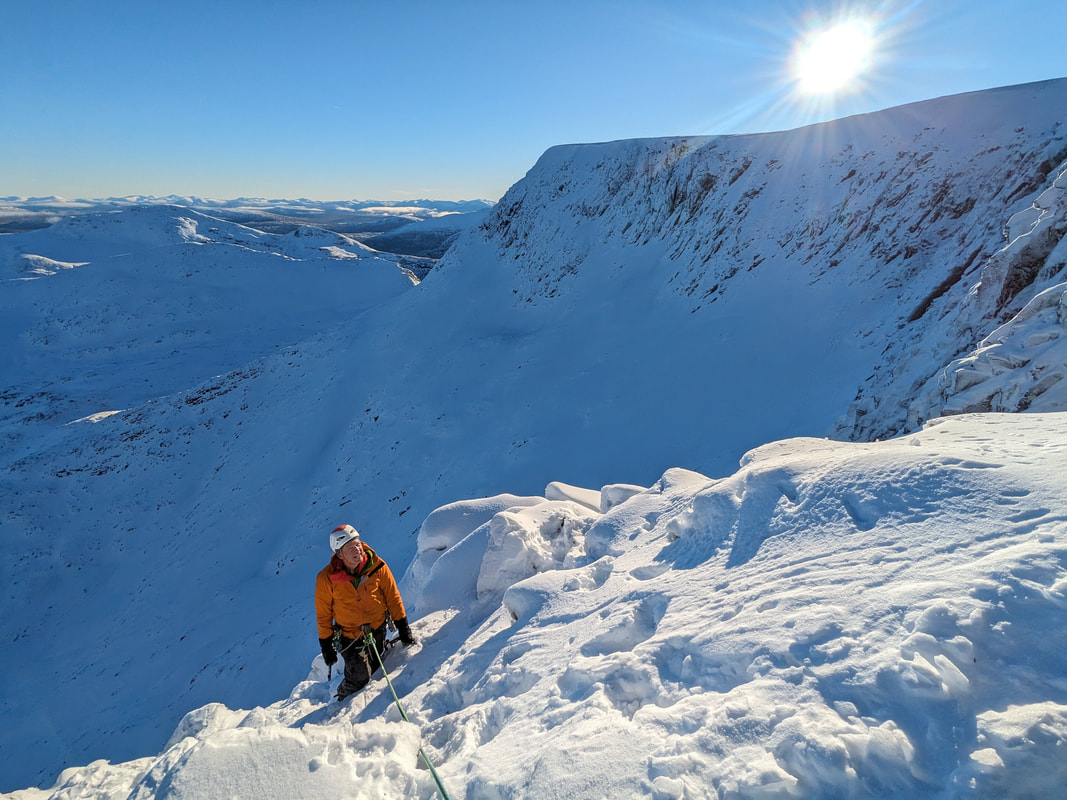
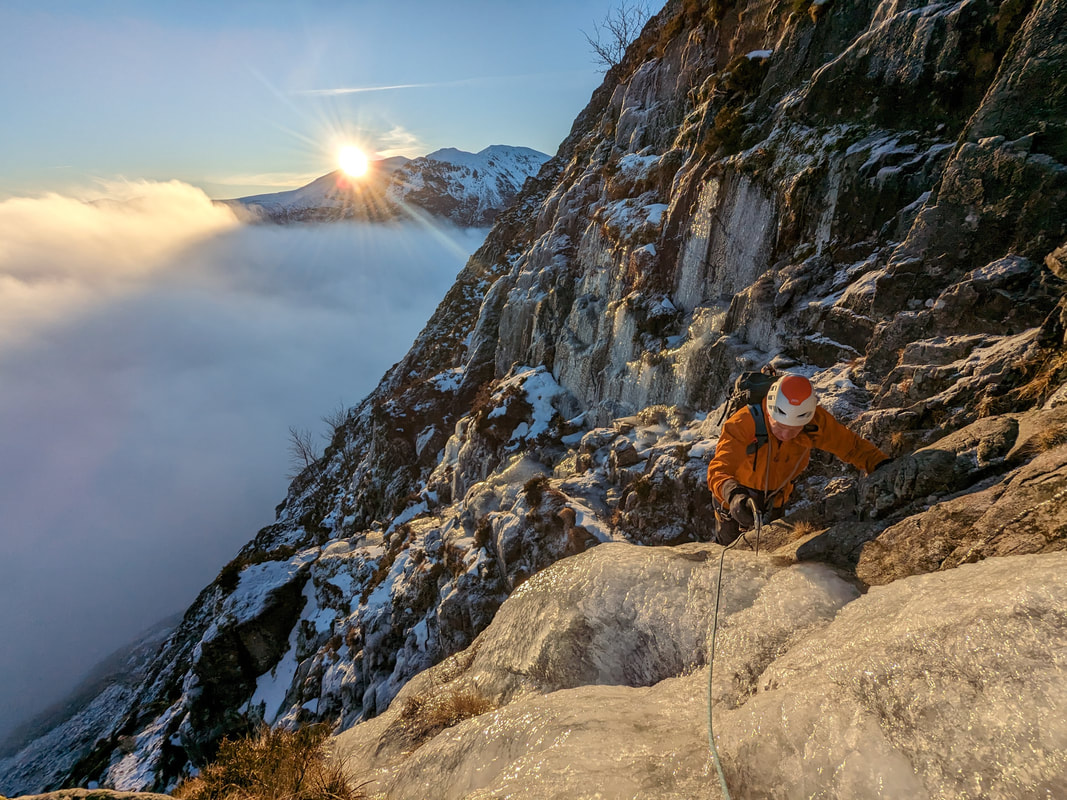
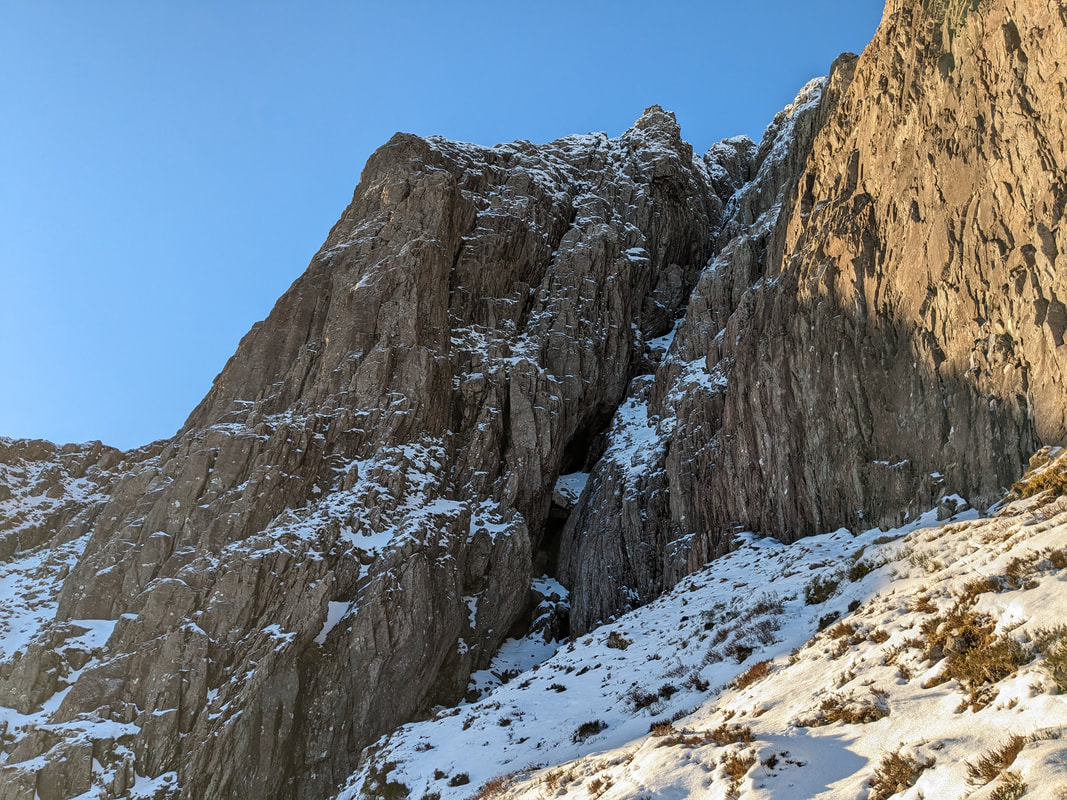
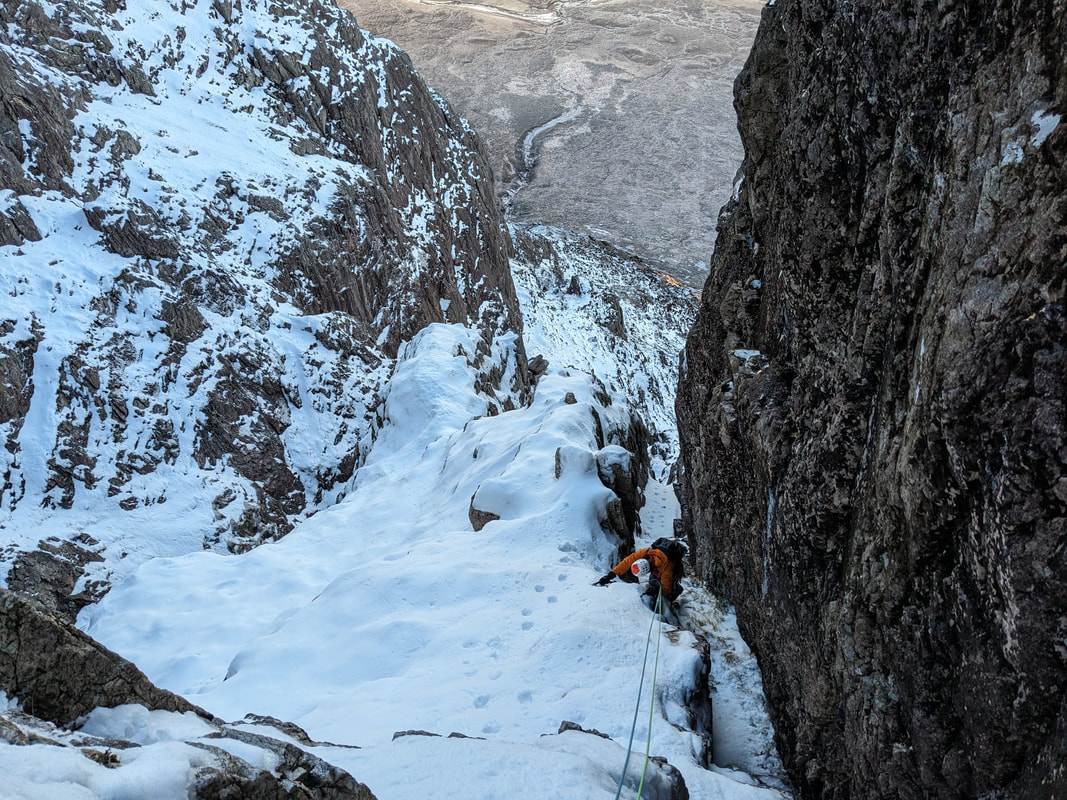
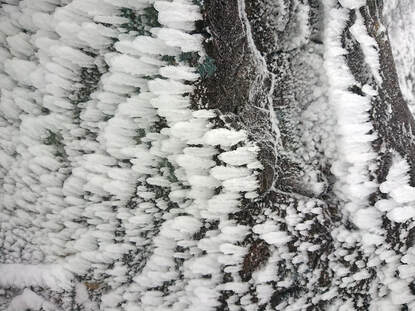
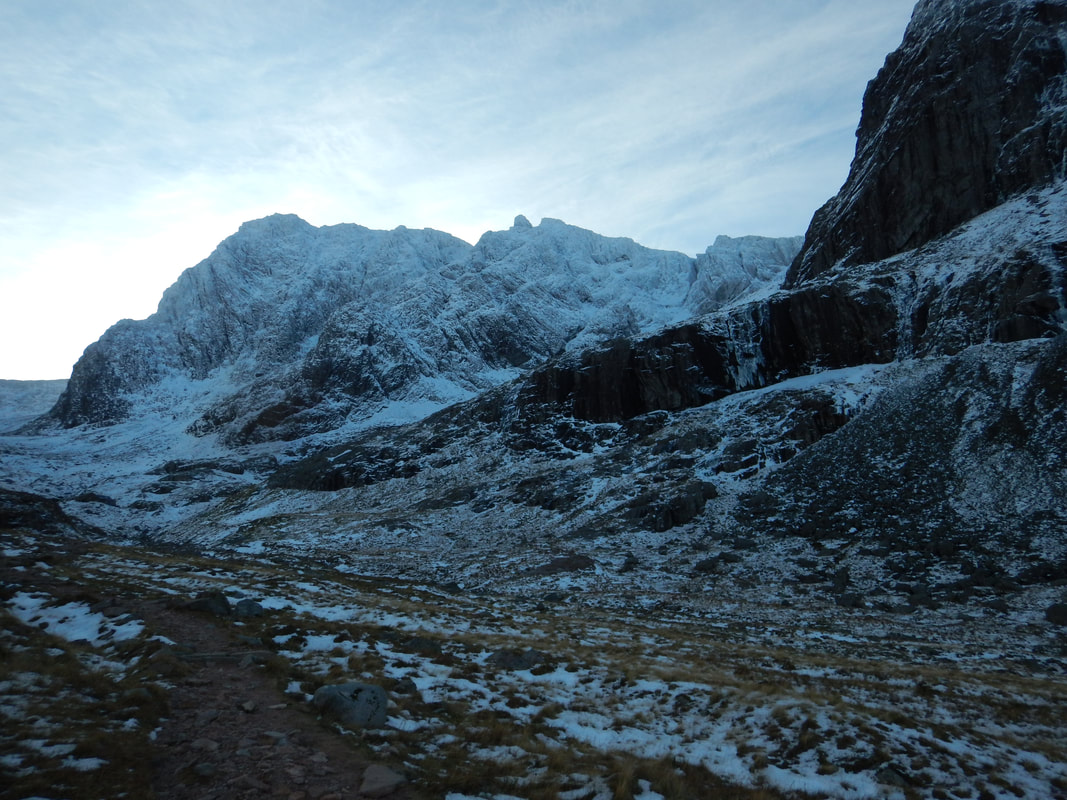
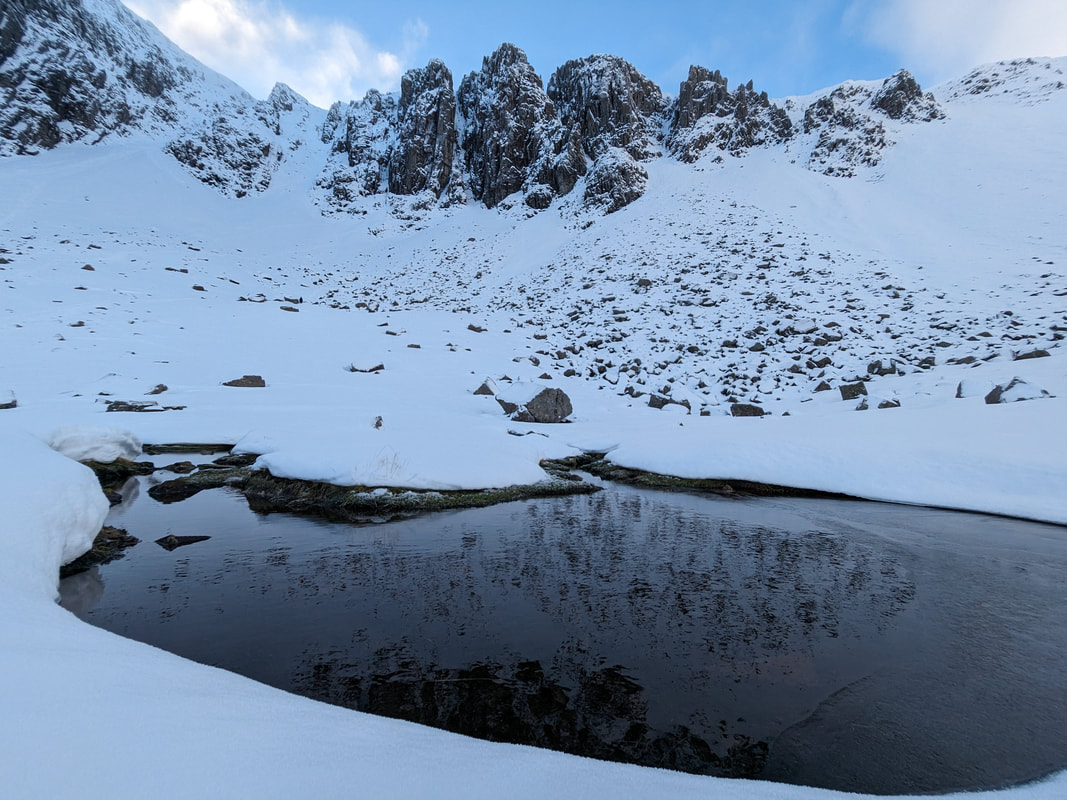 High pressure brought us settled, cold, dry weather last week after a reasonable cover of snow, a quick thaw and refreeze. It was a fantastic start to my winter of guiding and climbing in which Doug and I enjoyed stunning days out, fantastic climbing and dry gear at the end of every day. We started out on Stob Coire nan Lochan on Monday, climbing Raeburn's Buttress (AKA Central Buttress Ordinary Route). At grade IV,4 and in really friendly condition, this was a nice warm up, a reminder of the movement and feel of winter climbing. It was a fantastic way to get . Previous climbers had left boot prints if compacted snow which had frozen nicely to provide really nice sticks with the ice axes. Protection was easy to find, belay ledges pre-prepared, and travel around the mountain was simple on the firm snow. 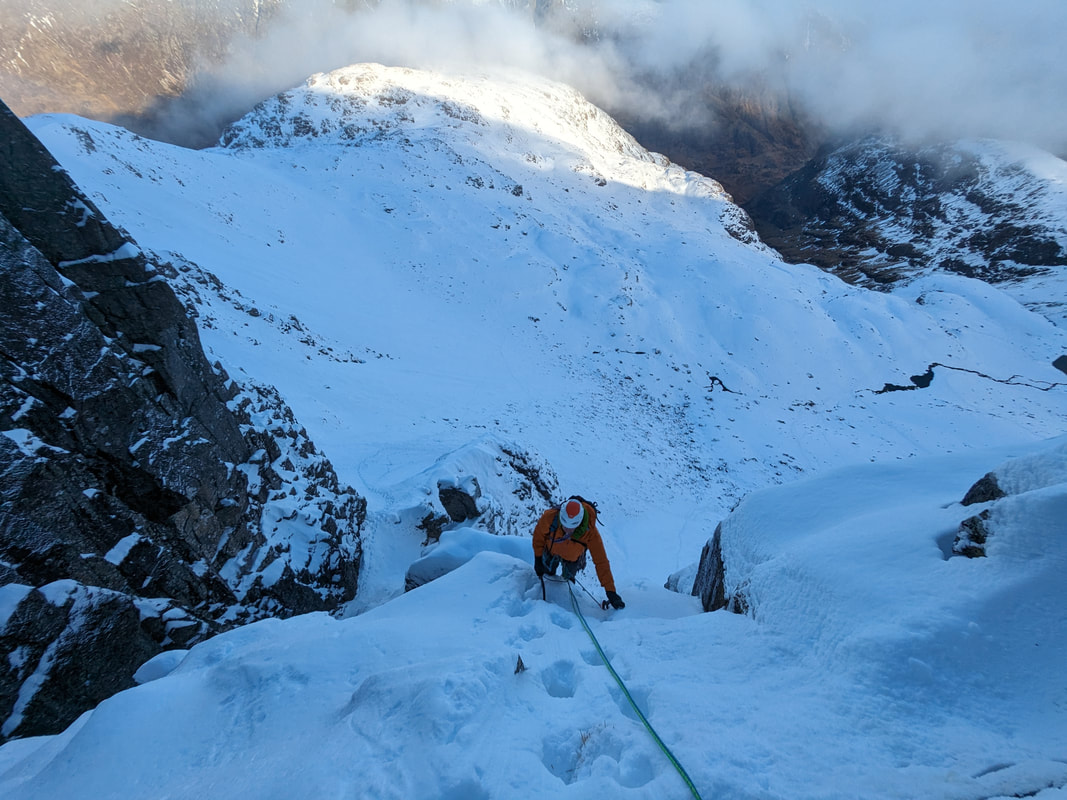 Ben Nevis was second and a climb called Lost the Place (V,5). I knew that this had also been climbed recently, so it would be nice for us to climb. The snow has been quite cruddy for climbing (but firm enough to walk on) in most places above 900m or 1000m. Climbing something first since the recent snowfall was pretty hard going. Ali and Kelvin climbed Maneater on Aonach Mor on Monday and had to dig it out from under the cruddy snow. Lost the Place is a brilliant mixed climb which is at the harder end of the grade V spectrum. The main long pitch up a groove is sustained and brilliant, there's a weird balancy move on the link pitch, then an intimidating overhanging chimney to finish. Warming up in the sunshine on top with nearly no wind and amazing views out west was outstanding. Doug and I upped the grade and effort levels again on Wednesday by going to Church Door Buttress on Bidean nam Bian. We climbed Crypt Route, a bizarre route that goes subterranean for much of it including a very small squeeze between chockstones. On previous ascents I have managed to fit through quite well but this time I found it properly hard! Full-on effort required for 1m of upward progress. A slightly easier day on Aonach Mor on Thursday gave us completely calm conditions, warm in the sunshine but cold in the shade. We went to the East Face (Coire an Lochain) and walked down Easy Gully to climb Morwind (IV,4). Early season conditions with little ice build up meant that we were climbing rimed rocks and frozen turf. Like this, the climb can feel a bit more tricky (and certainly not III,4 as listed in some guidebooks). Fantastic climbing though and wonderful views over to Schiehallion and the Cairngorms. We didn't take it easy on our last day, we went to Buachaille Etive Mor to climb Shelf Route (IV,6). This is a fantastic route that is not so well known giving six really fun pitches of chockstones and chimneys in a great position overlooking Crowberry Gully. There was just about enough snow at the start (which is quite low down) to make it feel wintry and by the top we were digging out the hooks and ledges from the cruddy snow. The top of the climbing is on Crowberry Ridge just below Crowberry Tower, so you still have to get up to the summit from there. It's a long climb and really good fun. The walk in and descent through Coire na Tulaich were about at tricky as the climbing with lots of water ice over the rocks and hoar frost covering everything that wasn't in the sunshine. As the weather started to show the first signs of changing with the high pressure drifting away we walked down reflecting on an amazing week of climbing. For me, there is always a bit of uncertainty at the start of every winter around my fitness, how I'll cope with back to back days out for many weeks, the physical and mental demands, but these were all addressed positively this week. It feels good to be at the start of another full winter of climbing (my 24th in a row). For Doug we nudged the experience and skills envelope a bit bigger by doing lots of mixed climbing on trad gear, a huge array of wacky three dimensional climbing and five big days in a row. We also discovered that we had been following Harold Raeburn around all week. He made the first ascent of Raeburn's Route, Raeburn's Chimney provides the route up from The Great Arch on Church Door Buttress, and he did the first ascent of a route next to Shelf Route. All of this more than 100 years ago! 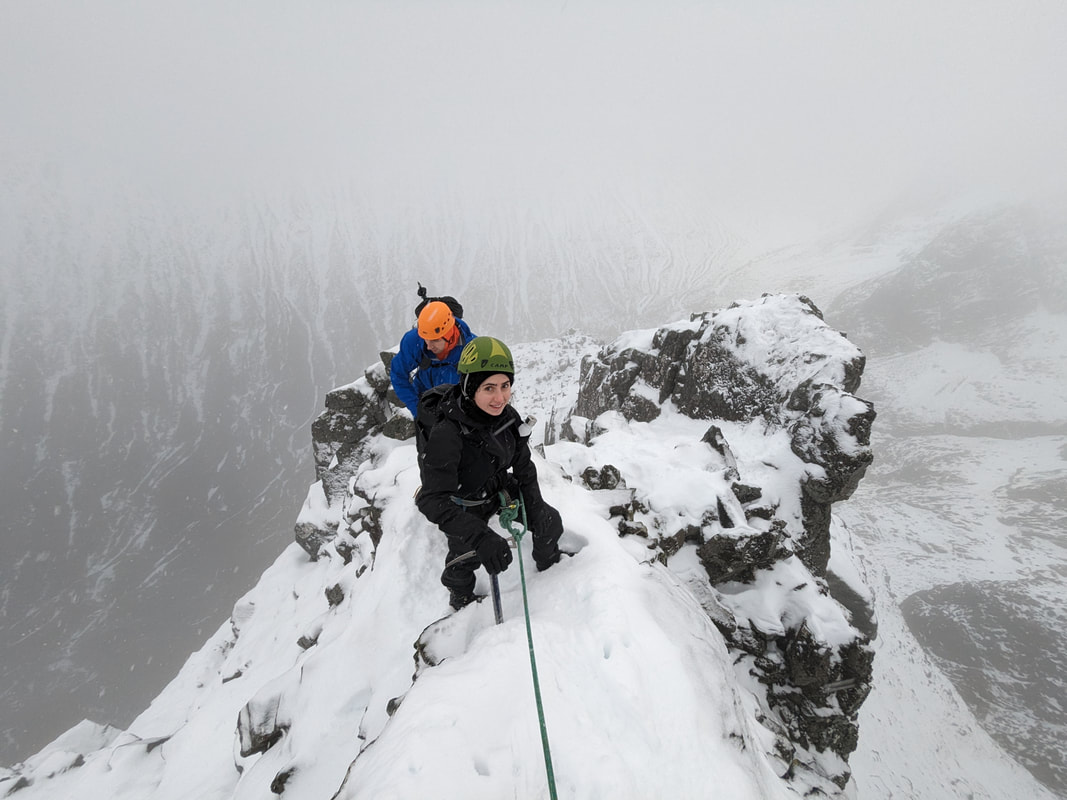 Between Christmas and New Year we had a couple of storms that brought a bit of snow for us. It is currently lying down to around 600m and is not very deep, but it is very welcome! On Monday (New Year's Day) I went into Coire na Ciste on Ben Nevis to climb Strident Edge with Ali. We had tried a couple of times previously and found it to be black. This time it was white and frozen with a light covering of rime and snow. Perfect for mixed climbing. The rest of this week has been a bit warmer so Strident Edge and the Trident Buttresses are black. Ali and I chose the right day to go climbing. 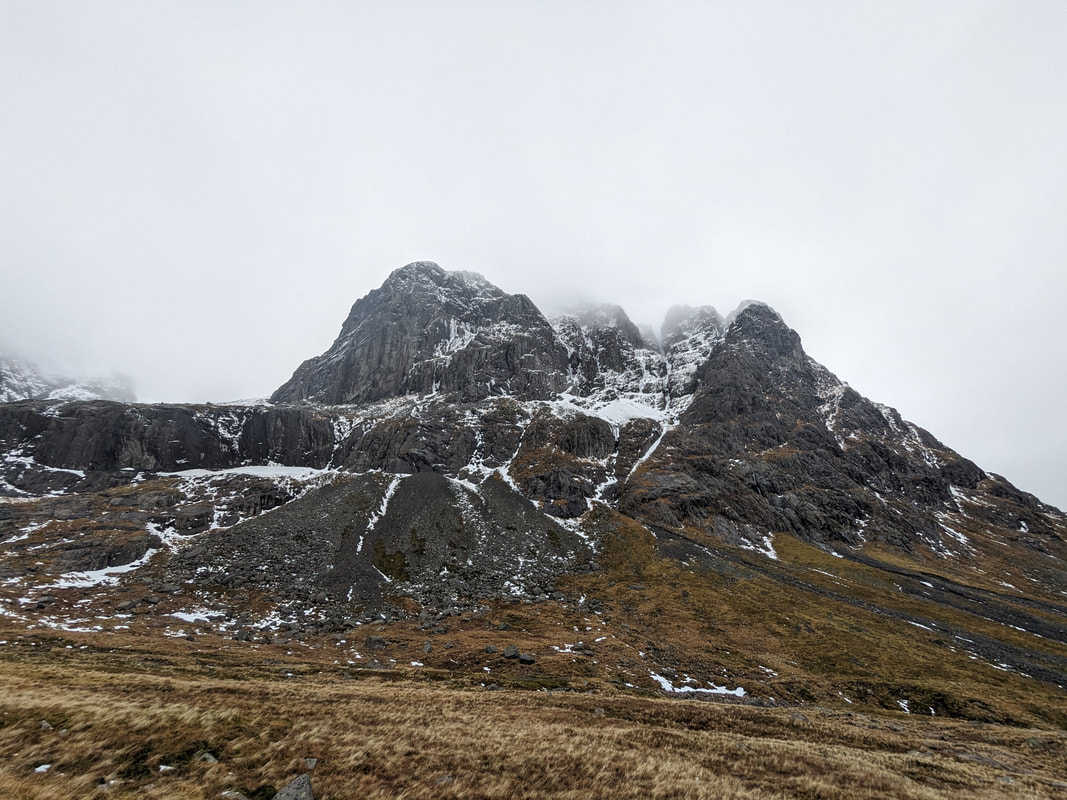 Today I had a lovely day with Elise and Dom climbing Ledge Route. This was their first day in crampons but they have done some scrambling and hiking previously. Ledge Route was a perfect way to the summit of Ben Nevis, learning crampon skills on the way as well as moving on a rope in a team of three. The snow was soggy today and we were glad to get above the freezing level, even if it was up at 1100m or so. Even on the summit the snow was soft and wet, and we also got a long shower of drizzly rain on the summit. The temperature seemed to have gone up by a couple of degrees as we walked across to the summit from Carn Dearg. 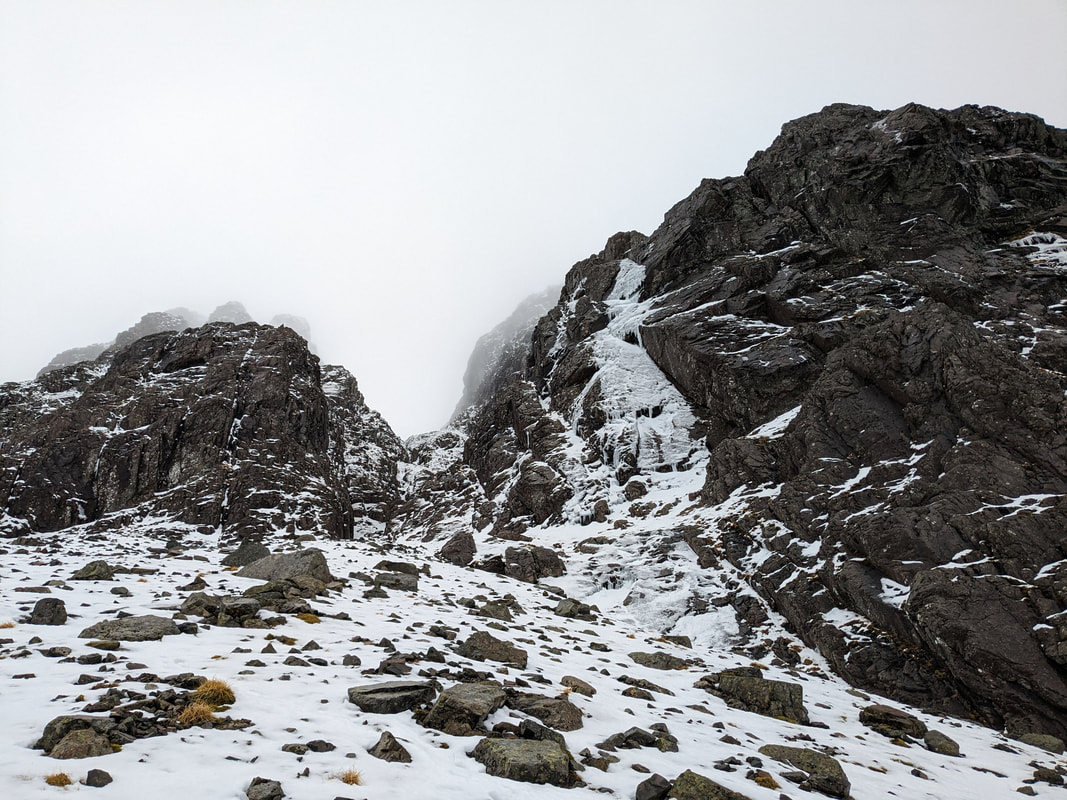 The warmer conditions are consolidating the snowpack ready to freeze up when the temperature drops again over the next few days. The big gullies are full but only with a thin cover of snow. There are no cornices above any of the gullies causing problems and people have climbed Number Four Gully and Number Two Gully. The scree slopes in the coires are half covered in snow with plenty of rocks still showing through. Ice had been forming nicely in drainage lines such as Waterfall Gully and The Curtain. However, at this altitude the ice has been melting for a few days now. It is not likely to build very fast unless it gets a lot colder. Mid-grade gullies such as Green Gully are not formed with snow-ice. They will take a couple more storms with fresh snow then thaw freeze cycles to build enough ice I think. 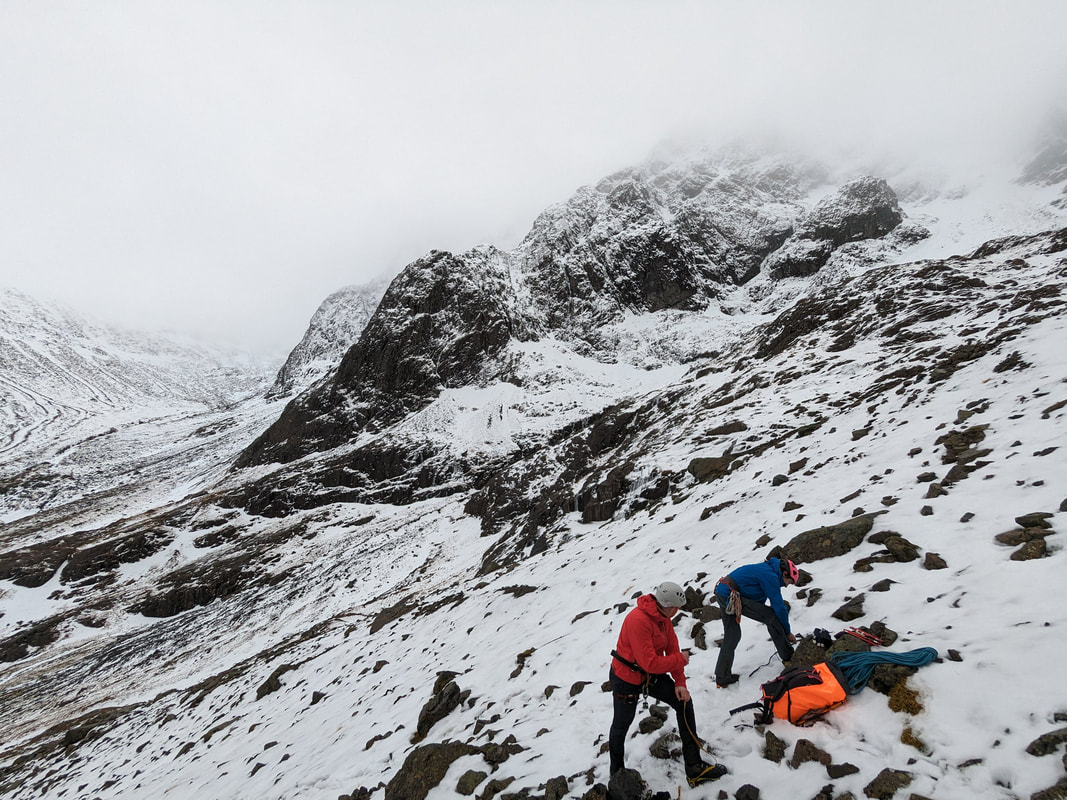 The big ridges such as Tower Ridge and NE Buttress look like fun, especially when the snow freezes in the next few days. Below about 1200m the rocks are black. Above 1200m there is now thick icy rime on the rocks, so they look white but will be quite tough for mixed climbing. There is lots of rime on the summit shelter and ruins. So, there is a limited selection of climbing to do, the ground is cold and we have a nice spell of weather coming our way with high pressure building. We will get more snow later this month I'm sure and plenty more storms so the ice will build through the season. But, it's not a bad start. 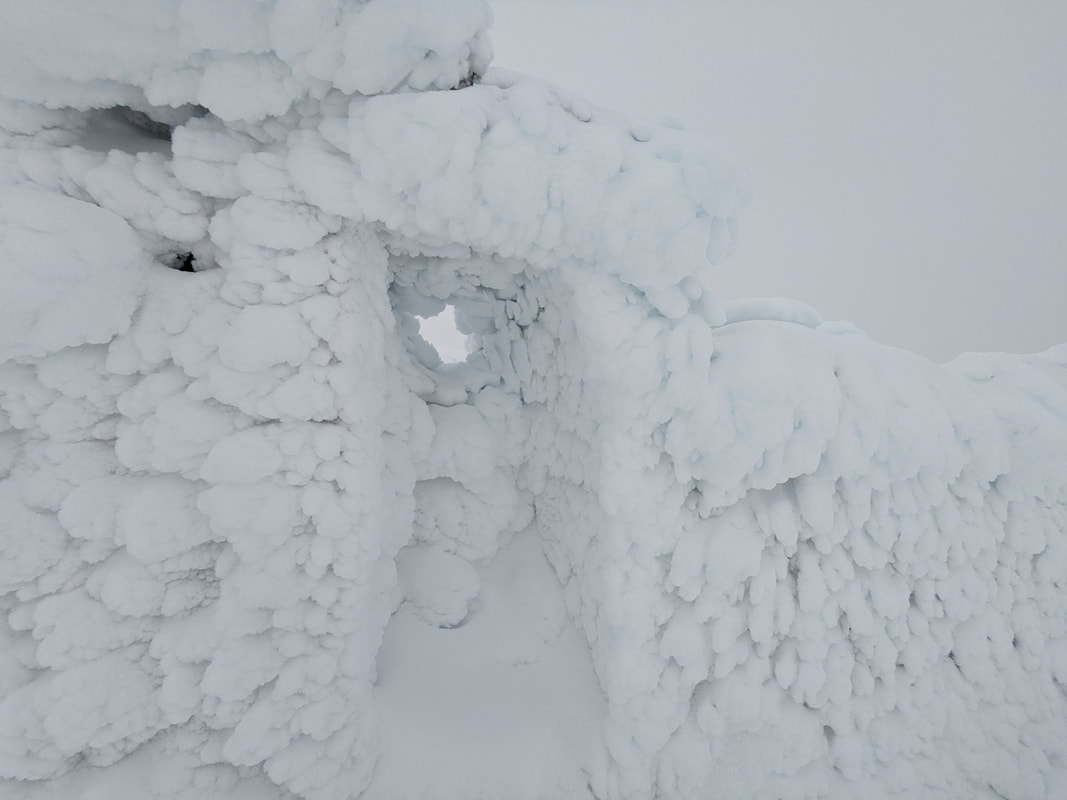 Water freezes into very different forms of ice. Here we look at three that affect winter climbers very much. Rime is what normally makes mixed climbs white enough to go and climb. Hoar Frost grows on horizontal surfaces in a cold, clear night and can create a very weak layer in the snowpack. Verglas is an invisible sheen of ice covering rocks, making them incredibly difficult to move over. 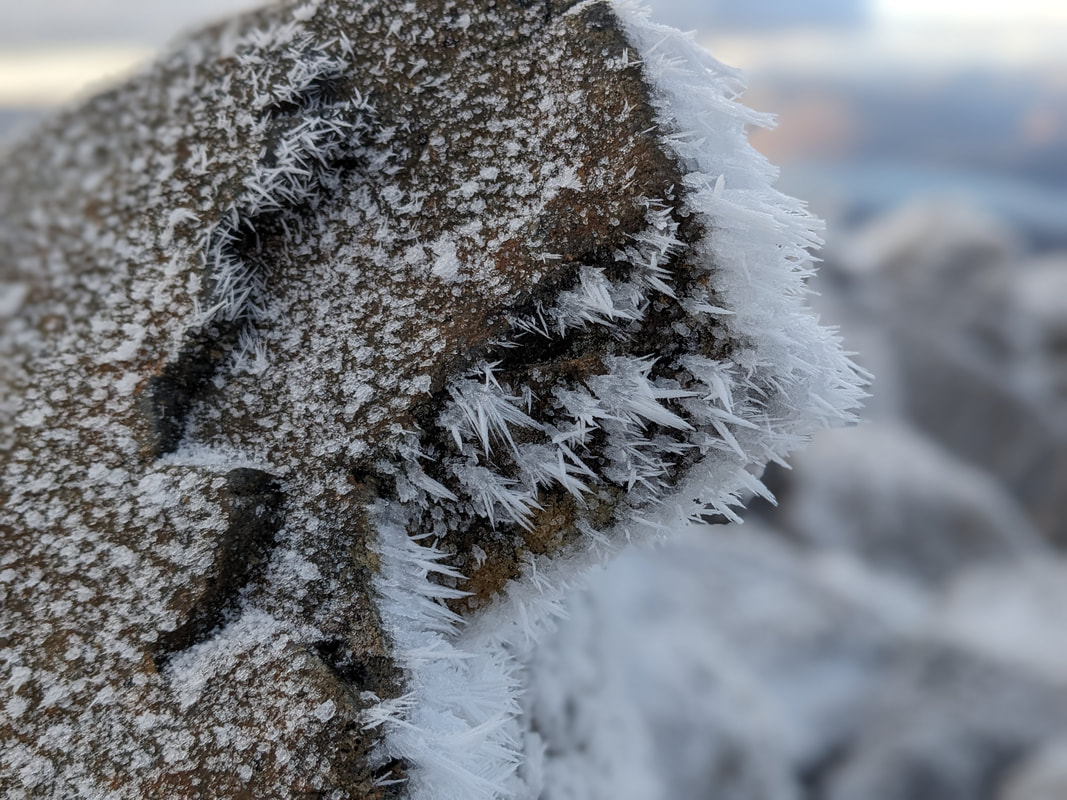 Rime is a type of ice crystal that grows on any surface exposed to humid air being blown onto it in a sub-zero temperature. It is often seen on fence posts and, perhaps confusingly, grows into the wind. So, you need a wind blowing cloud onto the crag and the temperature to be below zero. No snowfall is required at all. After a westerly gale, choose a crag that faces west and has been in the cloud. The best conditions in which I’ve climbed snowed-up rock have included well-frozen rocks and a light rime of a couple of centimetres that is easily brushed away to reveal (hopefully) cracks and ledges underneath. The crags have been totally white at the start of the day, with the climbs brushed free of rime by climbers on various routes. Sufficient rime to make crags and climbs white enough to climb can form overnight. Twelve hours of strong winds blowing freezing clouds onto the crag is enough to form a couple of centimetres of rime over every surface of the crag.
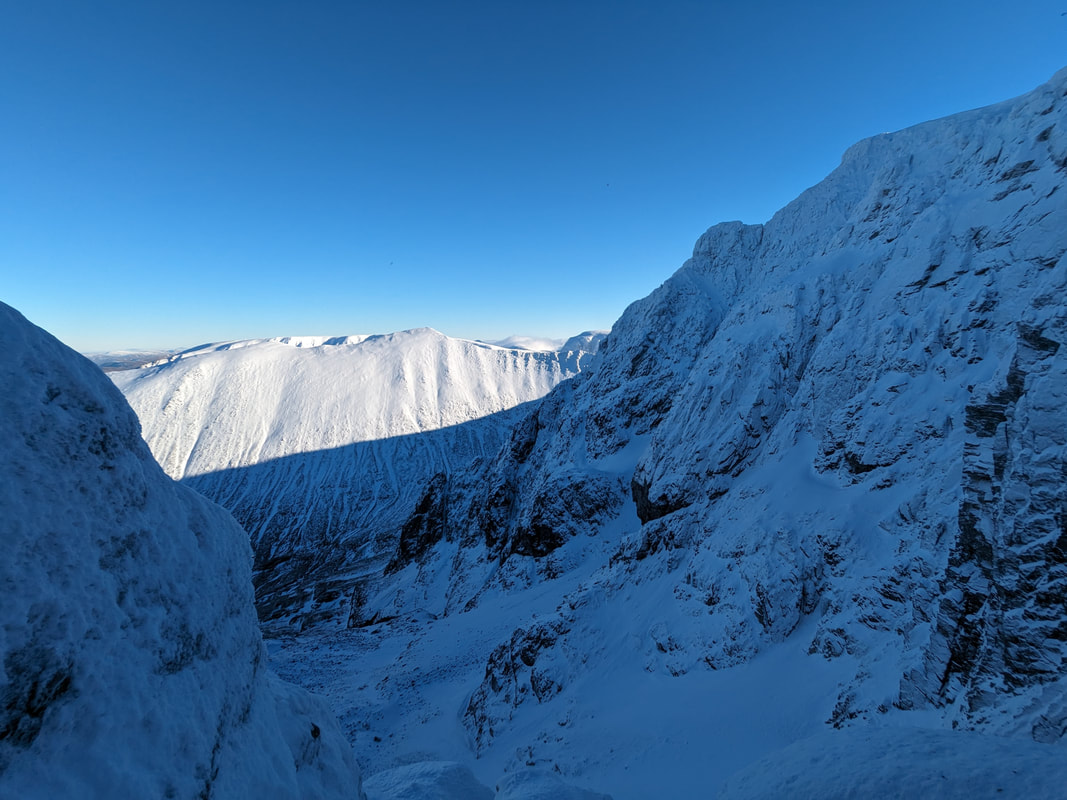
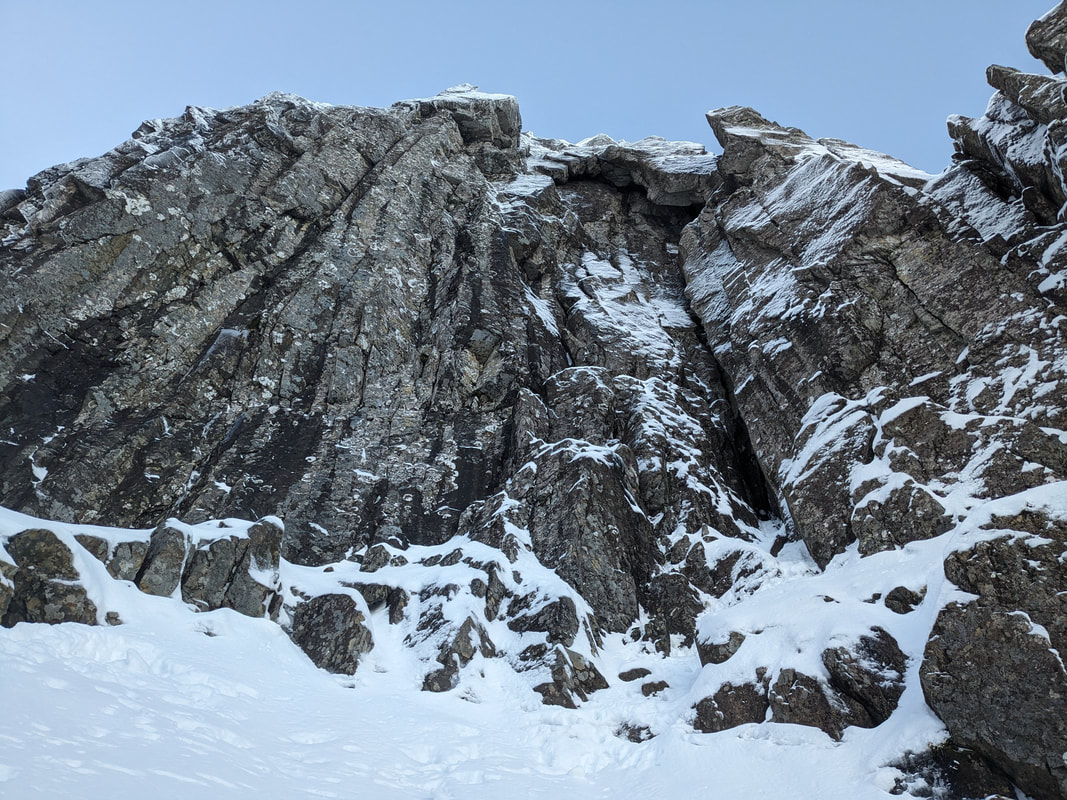
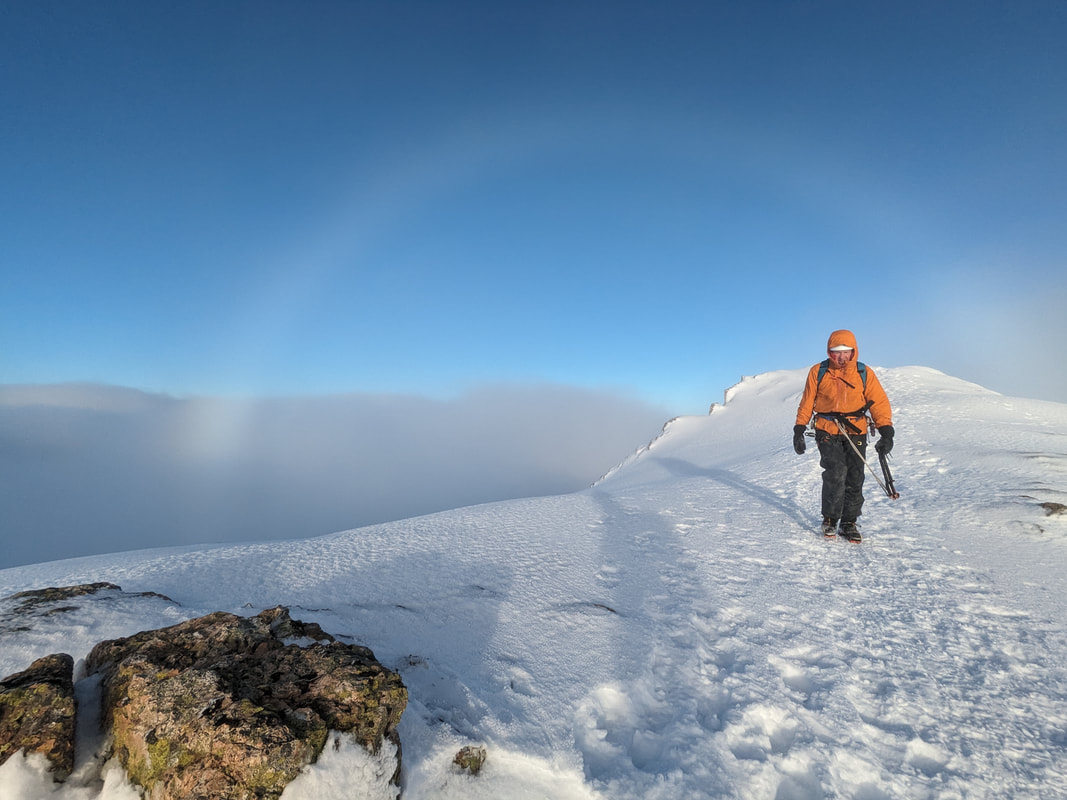
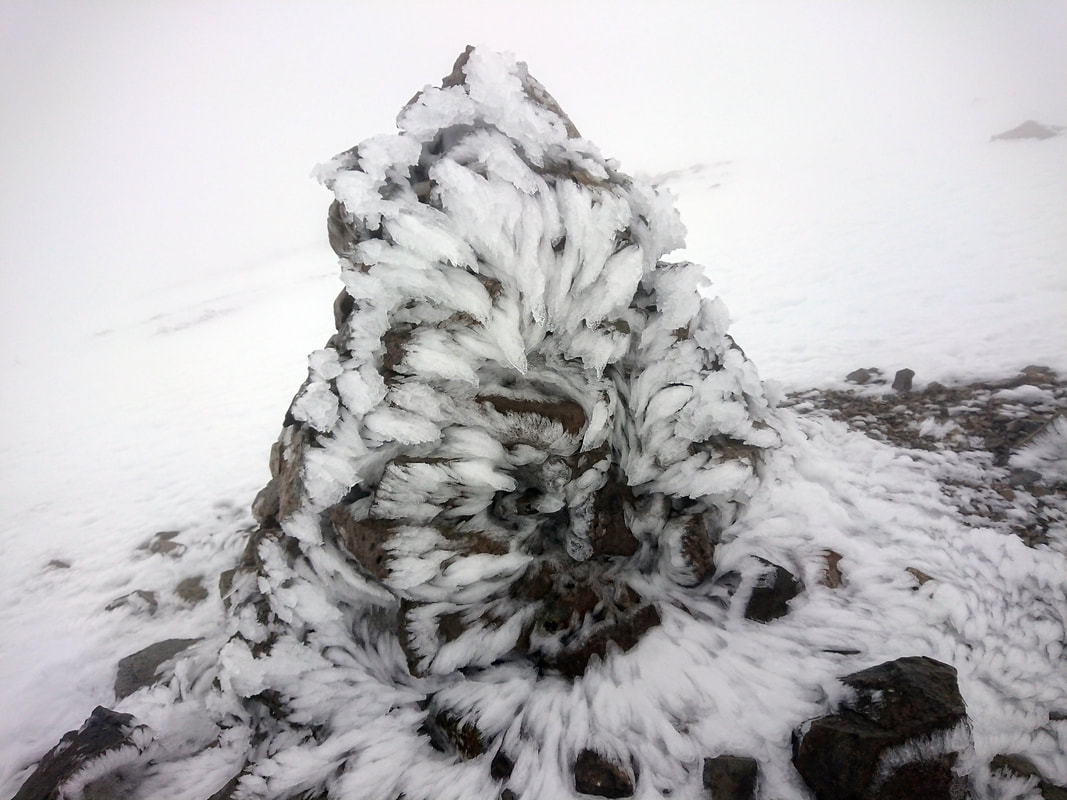
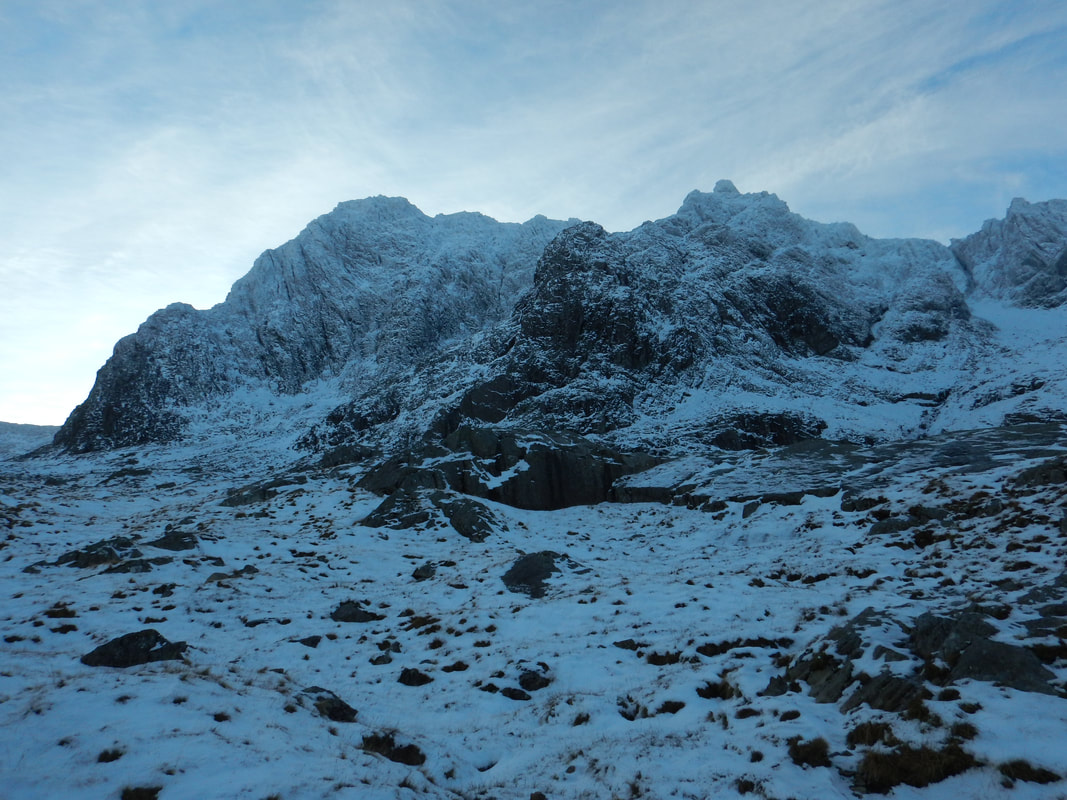
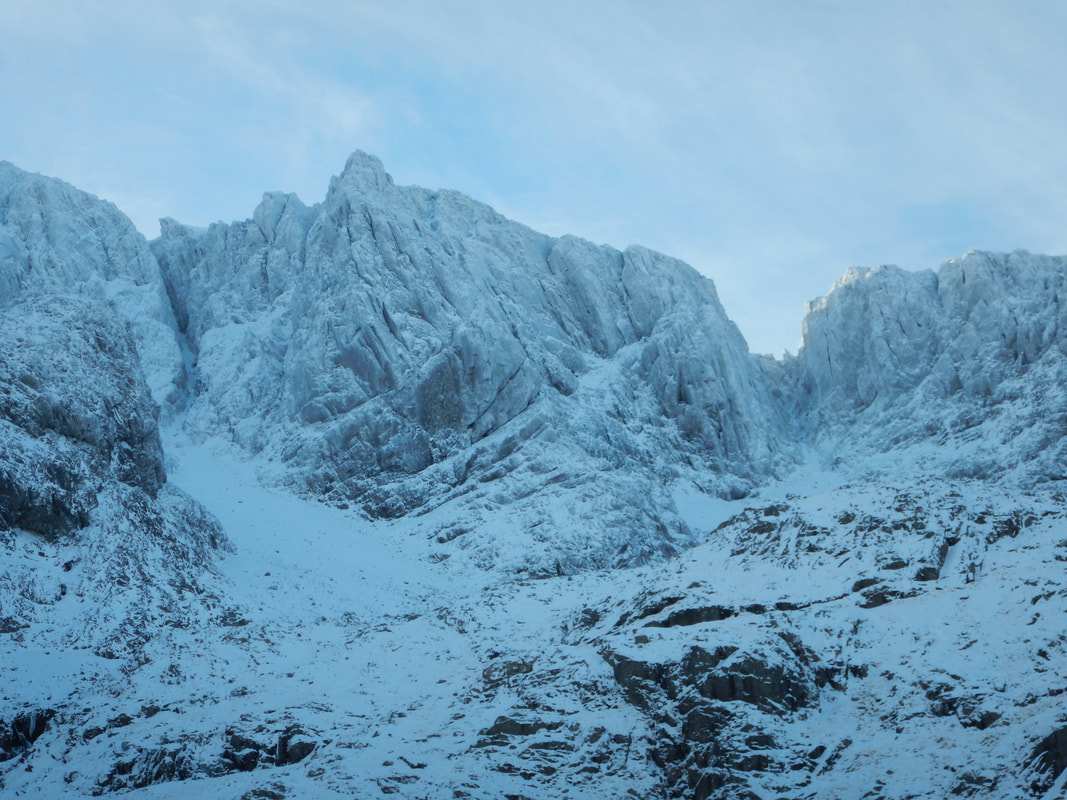
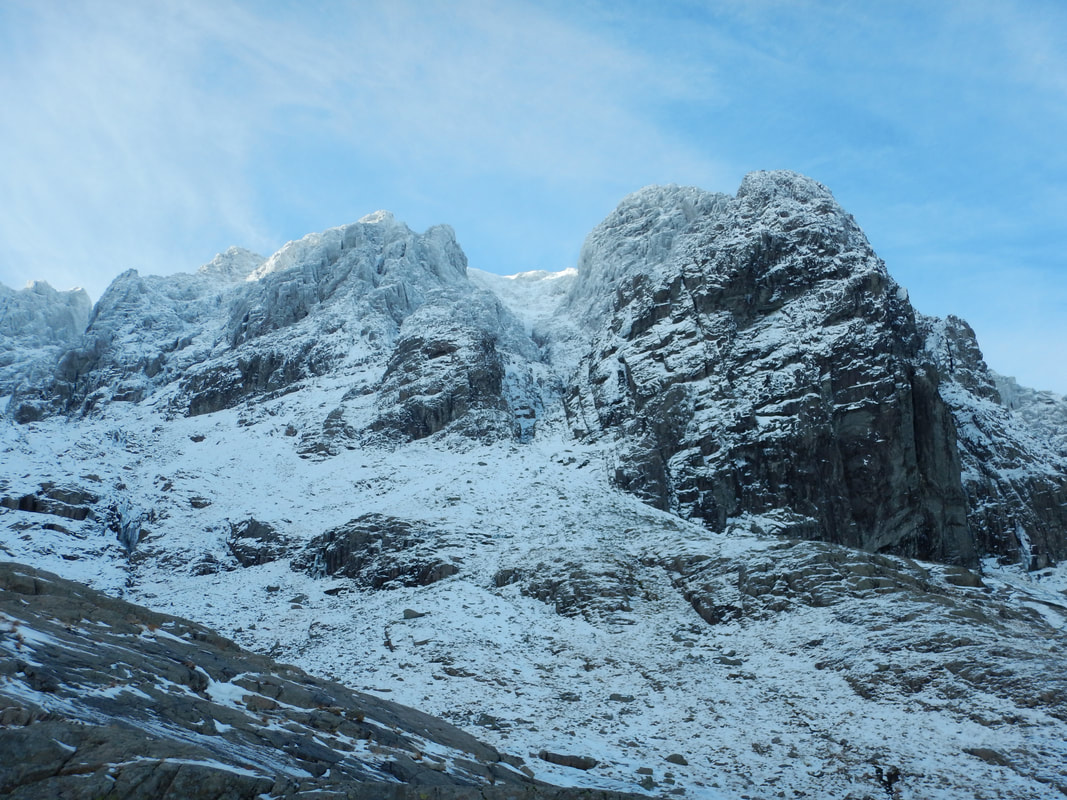
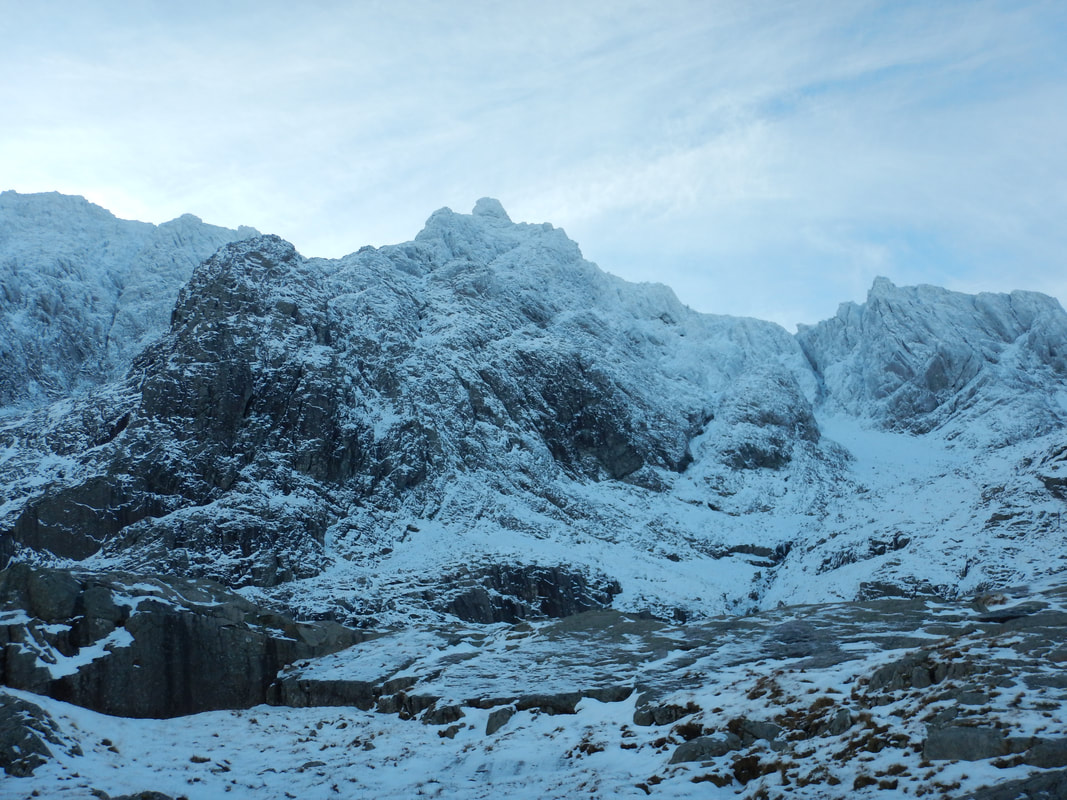
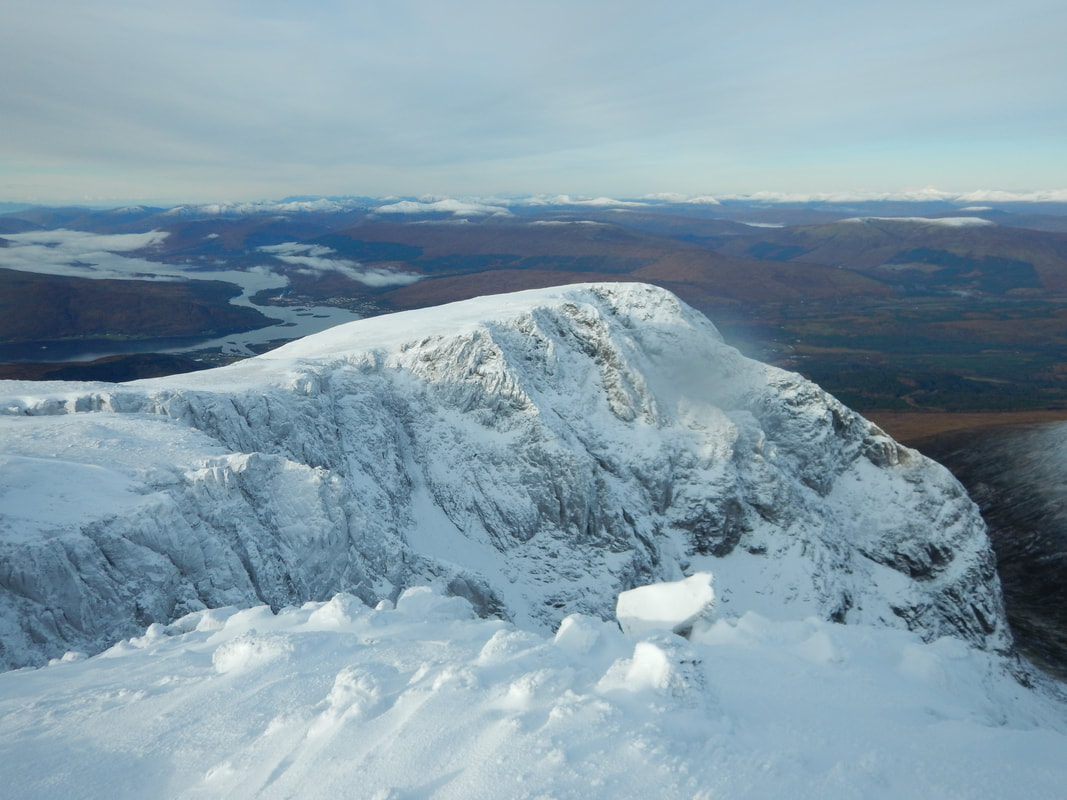
Delicate dry rime can fall off the crag in a strong wind and is likely to fall off in very dry, cold air. This means that the crag can be white one day and black the next despite the temperature staying below zero. Once the crag is out of the cloud the rime will start to deteriorate. Sunshine will also strip rime from the rocks faster than you can climb them. Over time, rime can grow to be a metre deep, and it turns very icy after thaw-freeze cycles. In March, the summit observatory ruins on Ben Nevis are often covered by incredibly thick rime ice that has built up over the previous three or four months and survived many thaw-freeze cycles. This type of rime makes life difficult if you want to climb the rock underneath it. Thick, icy rime it can be a monumental struggle to clear off the rocks for a whole pitch. 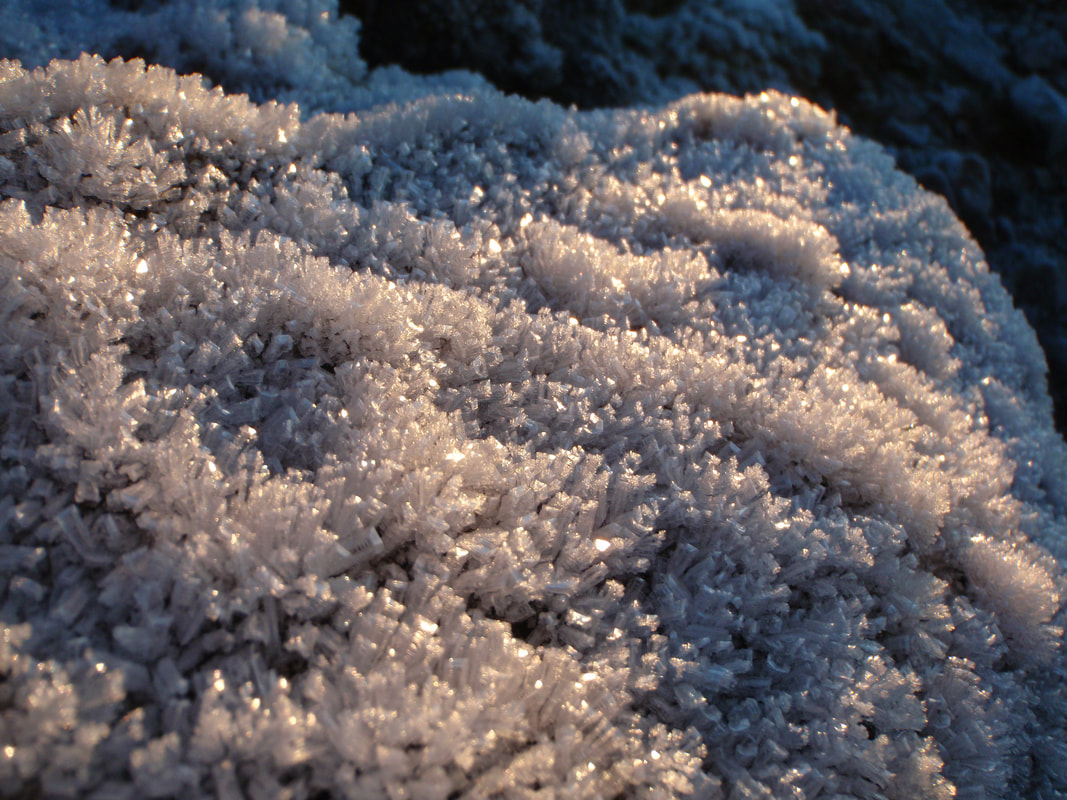 Hoar frost is very different to rime, apart from being a type of ice crystal. Hoar frost forms during a cold, still, starlit night and is what glistens on the grass and in the trees after a hard frost. Crystals of ice grow upwards as moisture in the air falls onto horizontal surfaces. Since hoar frost only forms on horizontal surfaces, it doesn’t turn steep crags white. So, by itself, it is not sufficient to create the winter conditions required. Hoar frost grows on the surface of the snow as well as anywhere else. When snow builds up on top of a layer of hoar frost, this buried hoar frost will stay intact and remain as a weak layer within the snowpack. The hoard frost crystals are strong enough to hold a substantial layer of snow on top, but they are prone to collapsing in a layer across a wide area. They act a bit like playing cards standing upright. In this position they can hold a lot of weight but if they are pushed in the right direction they will all fall over at the same time. Hoar frost crystals can grow very fast and a very thin layer of them is required to create a weak layer if they are later buried. So, a night of snow showers and clear spells can create a snowpack with weak layers. Remember that it does not need to be snowing for accumulations of snow to build up. The wind can transport snow that is already lying on the ground to other places where there is shelter from the wind. Clear, cold, windy nights can a create areas of windslab witting on a weak layer of hoar frost crystals.  Verglas covering the rocks on the Inaccessible Pinnacle Verglas is a thin covering of ice on all the rocks. When you look at the ground and you see rocks that look like they might be wet, but actually turn out to be icy, you've got verglas. Not surprisingly, verglas is really tough to deal with. Walking on a path can be tortuous, scrambling over verglas covered rocks is incredibly tenuous and climbing anything can be made impossible. Not only are the handholds and footholds very slippery, but cracks can be made useless for protection and slings slide off spikes very easily. Crampons can help a little but it feels like walking on bare rocks with crampons on which is never much fun. If the ground is very cold after a week of freezing weather, verglas can form instantly when the weather warms up a little. A moist cloud blowing over super cold rocks will freeze water droplets onto the rocks, creating a cover of very thin ice. If the temperature continues to rise the verglas will not survive very long, but there is a period when the rocks stay icy because they are much slower to warm up than the air. Alternatively, if the rocks are all wet when the temperature drops suddenly below freezing, the water on the rocks will freeze to create the same thin layer of ice everywhere. This verglas can last a lot longer if the temperature stays below freezing. I found conditions like this once when I walked in to climb Curved Ridge on Buachaille Etive Mor. We decided that wearing crampons for the path was the best way forward even though it looked like bare, wet rocks. On the way down we took off the crampons for the loose snow Coire na Tullach before putting them back on for the path back to the van at the end of the day.   I’ve often said to people, hillwalking and mountaineering are like meditation. We are removed physically and mentally from our every day lives. We get so involved in the moment, in the activity and its demands on us, that we very often forget all about our normal worries and anxieties. The more we are challenged by the activity, the less cognitive bandwidth we have for anything else. It’s only when we get back home that we remember about the outstanding bills, the anxiety caused by our work or any number of things that cause our mental fatigue. 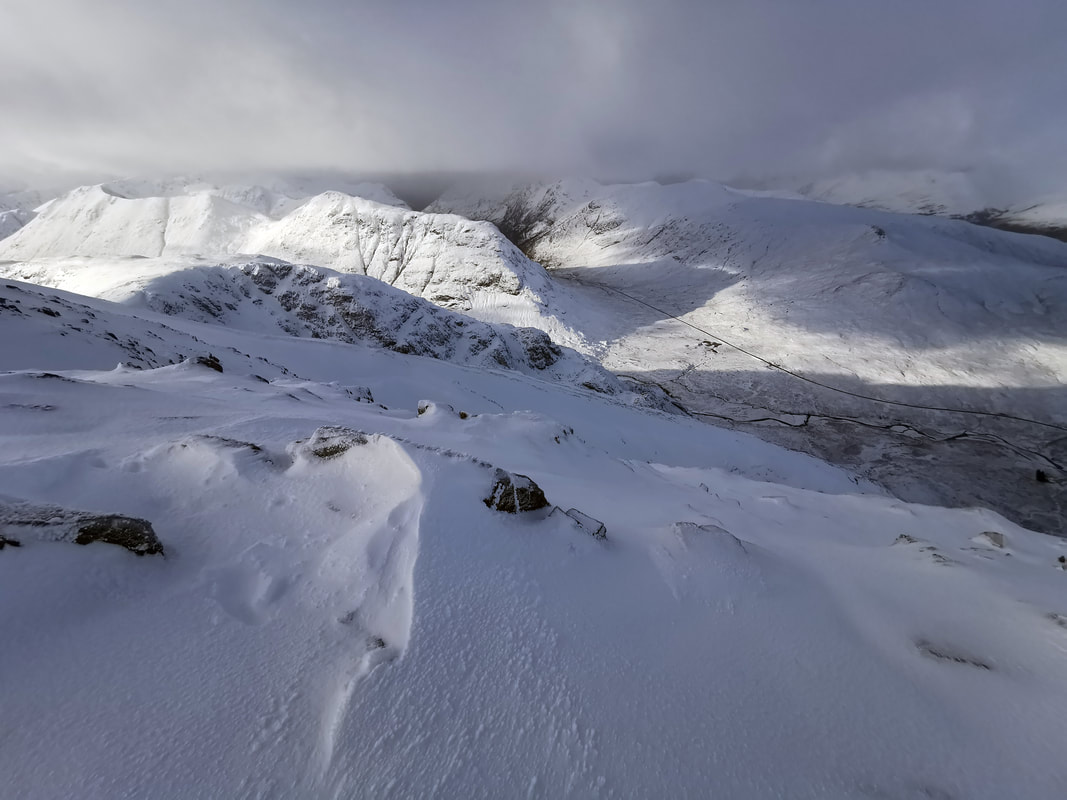 Modern day life in our urban, man-made environments, increases mental fatigue, stress and anxiety. Restoration of feelings of calm, relaxation, revitalisation and refreshment can be achieved by spending time in a natural environment. For it to be most effective, a natural environment should have three critical elements; it should give you the sense of being removed from your normal life and surroundings; it should contain visual elements and sensory elements that are fascinating in some way; and it should be expansive – it should have some degree of extension. For me, exploring our beautiful mountains is perfect! This is what “Attention Restoration Theory” tells us, that the human experience of the natural world markedly assists in maintaining and fostering a strong sense of subjective wellbeing. It's the idea that the natural environment has profound restorative effects on our wellbeing. 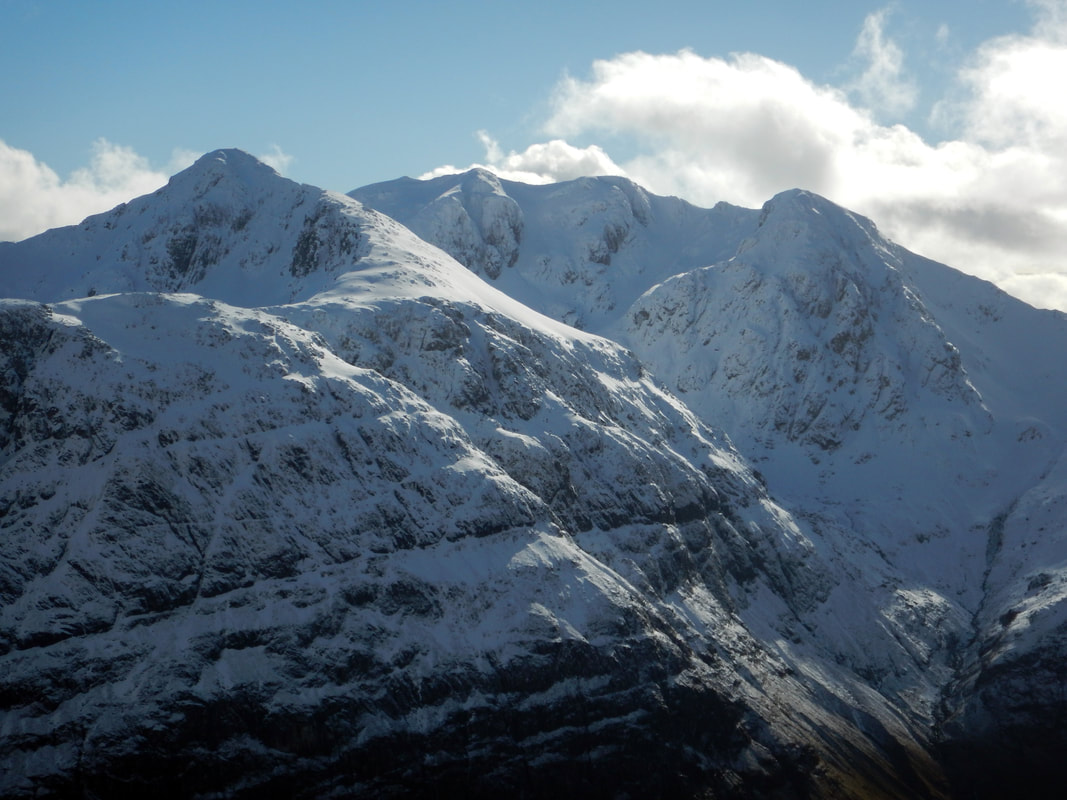 It’s really obvious that our mountains are full of astounding visual and sensory elements that are fascinating, beautiful, full of wonder and surprising. Over the last few years I have increased my knowledge of the natural environment massively, especially through projects such as The North Face Survey on Ben Nevis. It’s also clear to me that there is a never-ending supply of new knowledge to gain, new insights to understand and new things to see. This understanding of the very small things in our landscape makes my enjoyment of the vast scale of the landscape even more rewarding. 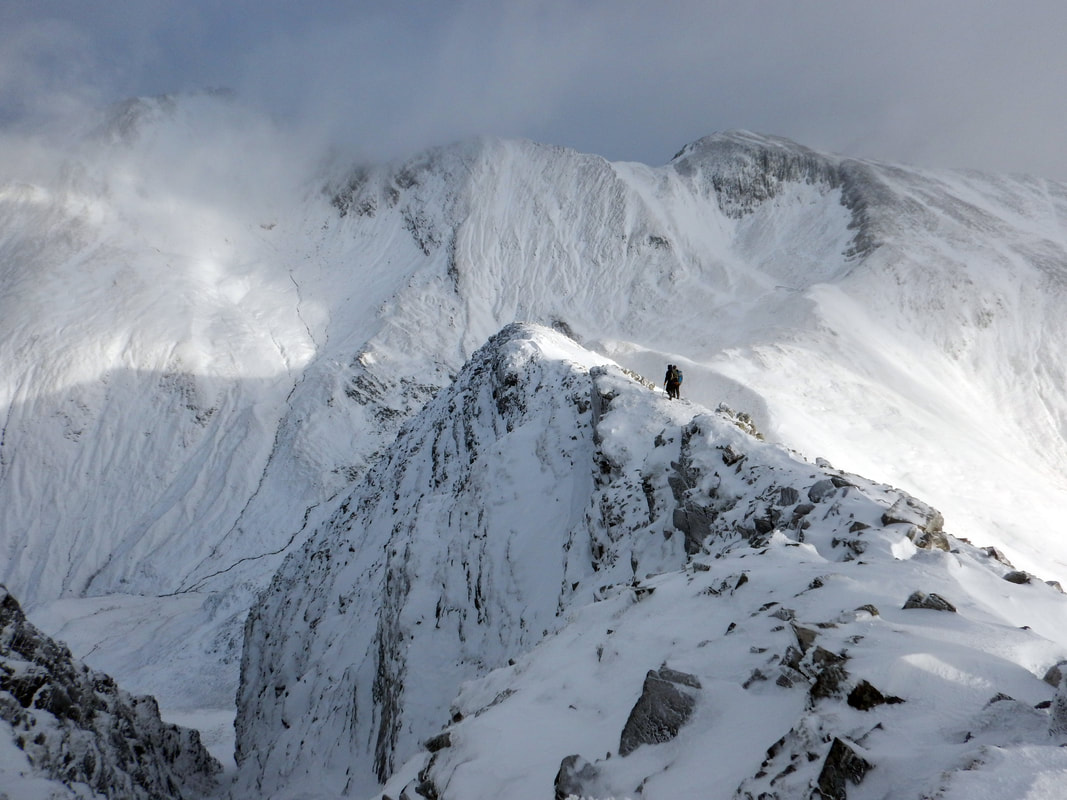 By exploring the mountains that surround us in Scotland we get to feel the immense scale of the landscape, the power of the weather, and the never-ending nature of wildness, that can give us a proper sense of scale. In a blizzard on a summit with numb fingers and an unrelenting wind, when we have to take a bearing on our compass to walk off safely there is nobody else we can turn to, nobody else we can blame if we get it wrong, and no sympathy in the weather or the landscape. It is a good reminder that each of us is not at the centre of things with the world revolving around us. We need to learn some humility and to take responsibility for ourselves. This is surely the expansive nature of the experience that is required to make its restorative effects most profound. 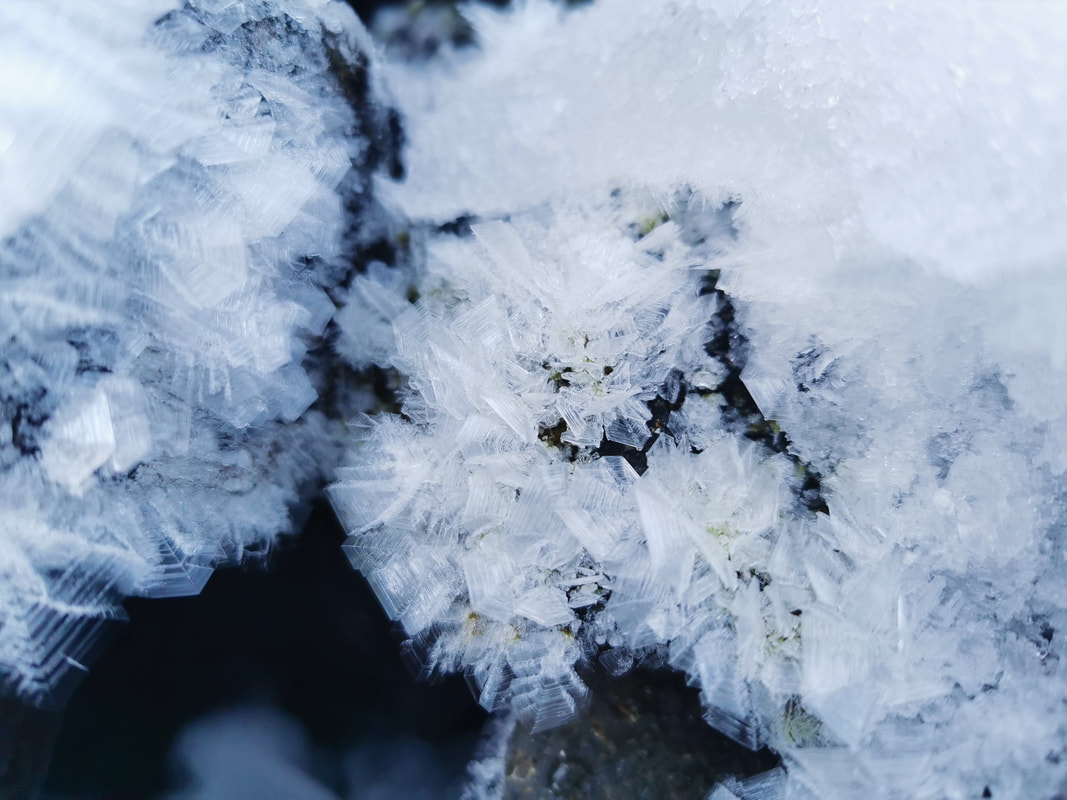 This is why I am passionate about spending time on our mountains. It maintains our physical health, it restores our mental health and it can have a profound influence on our spiritual well-being. It can counter the self-centred focus that modern day life has on us all. In these days of global climate change, an obesity epidemic, mental ill health and disconnectedness from nature, one solution is simple. Go for a walk, preferably a long one and immerse yourself in nature! 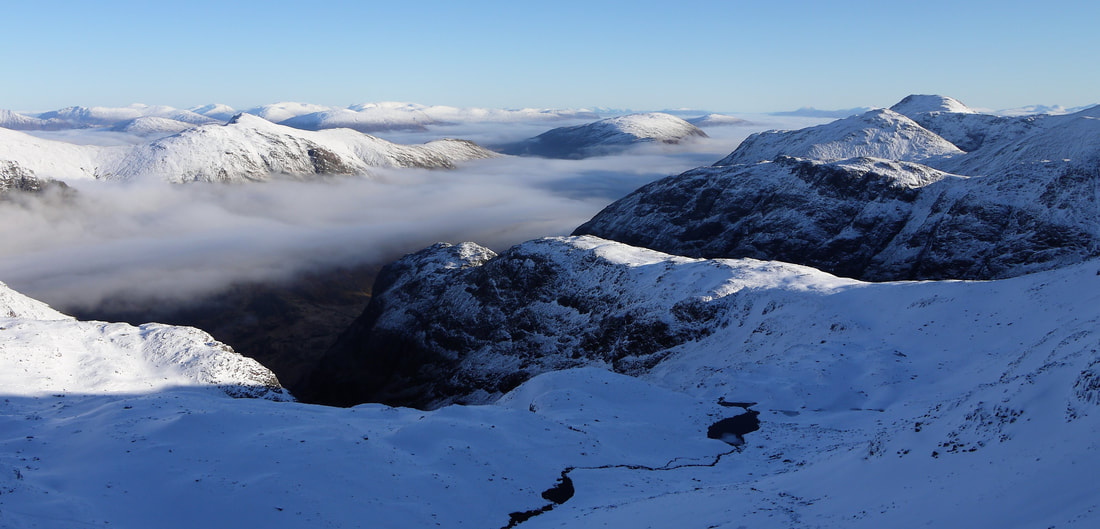 In good visibility, navigating up and back down Ben Nevis in winter can seem quite straightforward. It is a busy mountain and there is often a well trodden path to the summit, as well as cairns above 1150m about every 50m along the way. When you can see as far as Skye to the west and Cairngorm to the east, it is not surprising that you should be able to find your way easily. Even then, the path above 900m or so is usually covered in snow between December and May and can be nearly impossible to find and follow. If there is no boot trail through the snow, it can be quite confusing, even in good visibility. And the summit is only clear about 20% of the time in winter. In the cloud, when there is no definition between the snow on the ground and the snow and cloud in the air all around you it is a very serious place, and navigation skills need to be very accurate. The skills you need are to be able to follow a compass bearing accurately, and to measure the distance you walk along the ground by counting your paces. With these skills, you can then follow your progress on the map and plan the next section of walking, as long as you are very used to using maps and identifying features on the ground that are marked on the map. Of course, most features will be covered by the snow, just to make it even harder! 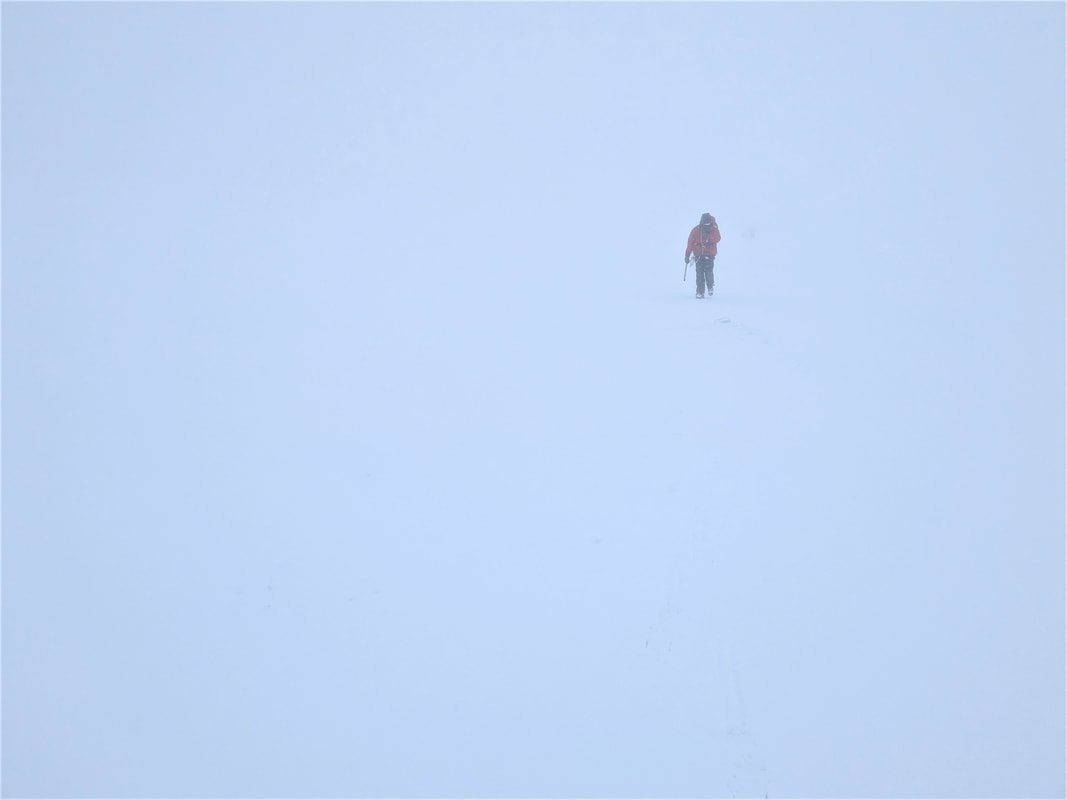 The high summit plateau of Ben Nevis is surrounded on nearly all sides by steep and difficult ground. Many accidents have occurred in descent. Often this part of the day will call for more concentration and judgement than any other time, especially in considering human factors that will influence decision making. Even if you make it to the top, getting down again can be the hardest thing. The best and quickest descent is by the Mountain Track. Careful use of map, compass, pacing, possibly GPS and the sketch plan of the cliffs given below will help to get you down, but local knowledge is invaluable. When visibility is good, make a close study of the general topography of the mountain; if possible visit the summit plateau with a view to memorising its details and recording important compass/GPS bearings. The ruined observatory, topped by a survival shelter, is an unmistakable landmark on the summit itself, even when the neighbouring triangulation point and numerous cairns are covered by snow.
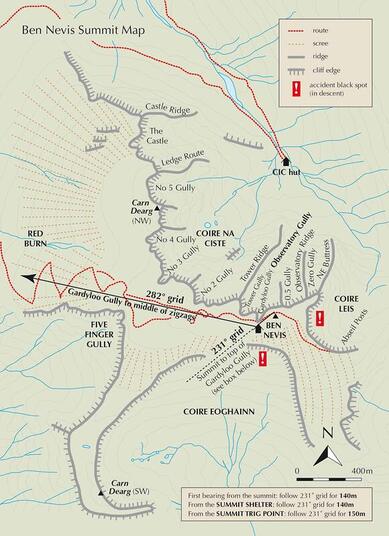
Follow a grid bearing of 231° (grid) for 150m from the summit shelter. This will avoid the steep drop of Gardyloo Gully close on your right. You should find three cairns close together, as long as they are not buried in snow. Then follow a bearing of 282° (grid) to the 1200m contour and as far down as you need. In 2024 grid north is very close to magnetic north so you can set your compass to these bearings. In future years magnetic north will move and you will need to adjust these grid bearings accordingly. On the second bearing you should reach a short steeper section after 300m and continuously steeper ground after 900m of downhill travel. A line of well built cairns now marks this route at fifty metre intervals to the top of the zig zags on the Mountain Track, however the cairns can not be used alone in poor visibility without following a compass bearing. Continue on down a steep but easy slope for another 1km on the same bearing until you find the Mountain Track and you can follow this. It crosses the Red Burn at 670m so don't descend below this altitude on this bearing. 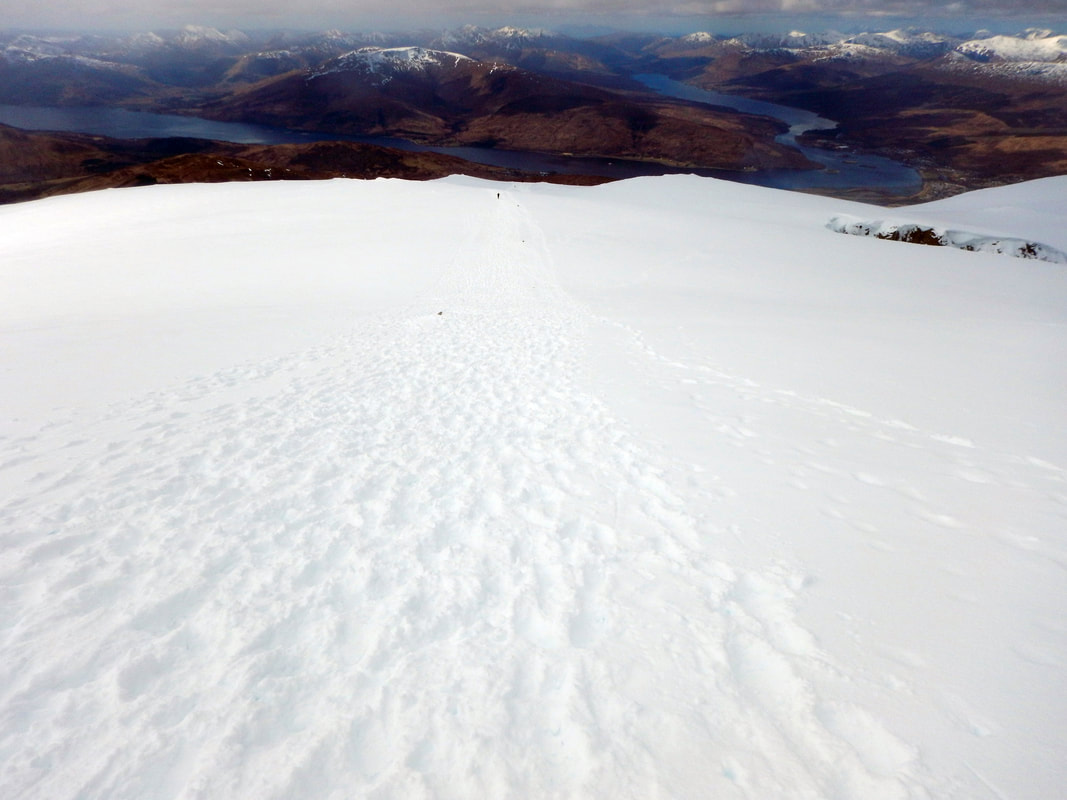 Can I just follow the cairns? The cairns that have been built above 1150m are there to help you. They will let you know that you are going in the right direction, but you will need to use your compass to keep you walking straight in the right direction. You can not rely on being able to walk in a straight line without a compass. It is common to have visibility of about 10m, so you will not be able to see the next cairn 50m away. The cairns get covered in rime and snow that make them blend in to the snow on the ground, so they can be very hard to see. In winters with a lot of snow, the cairns can become buried. The picture above has 5 cairns, all over 1m tall, all buried in the snow. How do you follow a compass bearing? The summit of Ben Nevis in poor visibility is not the place to learn! This is a skill to practice and perfect somewhere with no hazards around you. Go on a course or ask a friend with these skills to help you. After setting the right bearing (see diagram above) hold your compass in front of you with the Direction of Travel arrow pointing in whichever direction you happen to be facing. Keep holding the compass in front of you and turn around until the north end of the magnetic needle lines up with the north arrow in the compass housing (the north end of the magnetic needle on your compass will probably be coloured red and some compass needles also have "N" on the needle). It is your body that turns - not the compass baseplate. The Direction of Travel arrow now "does what it says on the tin" - tells you which way to go. While you walk along, you need to hold the compass centrally in front of your body with the baseplate horizontal and positioned so that you can see the alignment of the magnetic needle whilst at the same time looking along the Direction of Travel arrow. Make sure your phone is not close (within 40cm) to your compass, and that there is nothing made of steel near by (such as ice axes or walking poles). These will make your compass needle point in the wrong direction.  How do you measure the distance? From the summit you need to walk 150m on a bearing of 231° (grid). You can measure this distance by pacing, counting the number of paces you take. Having practiced a lot in a friendly place, I know that I take 60 paces (that is 120 individual steps) to cover 100m along the ground. If the snow is deep and soft I will take a few more paces, and if I am tired or carrying a heavy pack I will take more again. However, for me, 60 paces is a pretty good measurement of 100m. To measure 150m I will walk along following my compass bearing, counting until I get to 60 paces (100m). Then I will start counting again from zero the 30 paces to measure the 50m. You need to know how many paces you take to cover 100m. It will probably be a different number to mine. You should do this somewhere with no hazards, well in advance of needing to do it for real. Measure the distance with a 50m climbing rope, or on a running track, or find a straight path on a map with distinct and easily recognisable features that are exactly 100m apart and practice there. Best still, do all three of these to get your pacing very accurate, then practice it in the snow wearing your winter boots and carrying your rucksack. 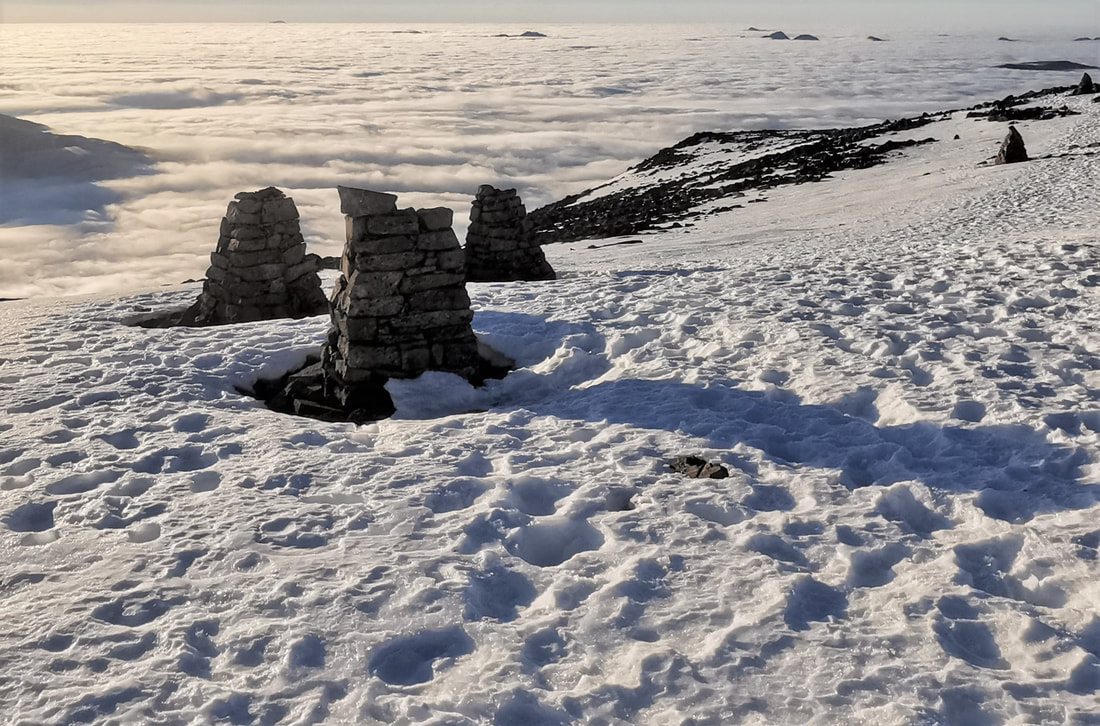 After walking 150m you should see three cairns close together, as long as they are not covered by snow. This is the point that you turn right in descent, change to the second bearing of 282° (grid) and walk off in this direction. These three cairns are positioned to point you in the right direction. The central one is the turning point; the first and central cairns line up with where you have come from; the central one and the third one line up with where you need to go next. Have a look at the image below. The central cairn and the third cairn clearly line up with the cairns on the bearing of 282° (grid) which will lead you across the plateau to the 1200m mark and down onto the zig zags of the Mountain Track. It is nice to know this, and quite obvious when the weather is clear. In poor visibility, this is another little thing to tell you that you are going in the right direction. However, you will still need to use your compass to keep you going in the right direction between the cairns and if you can't see the cairns. 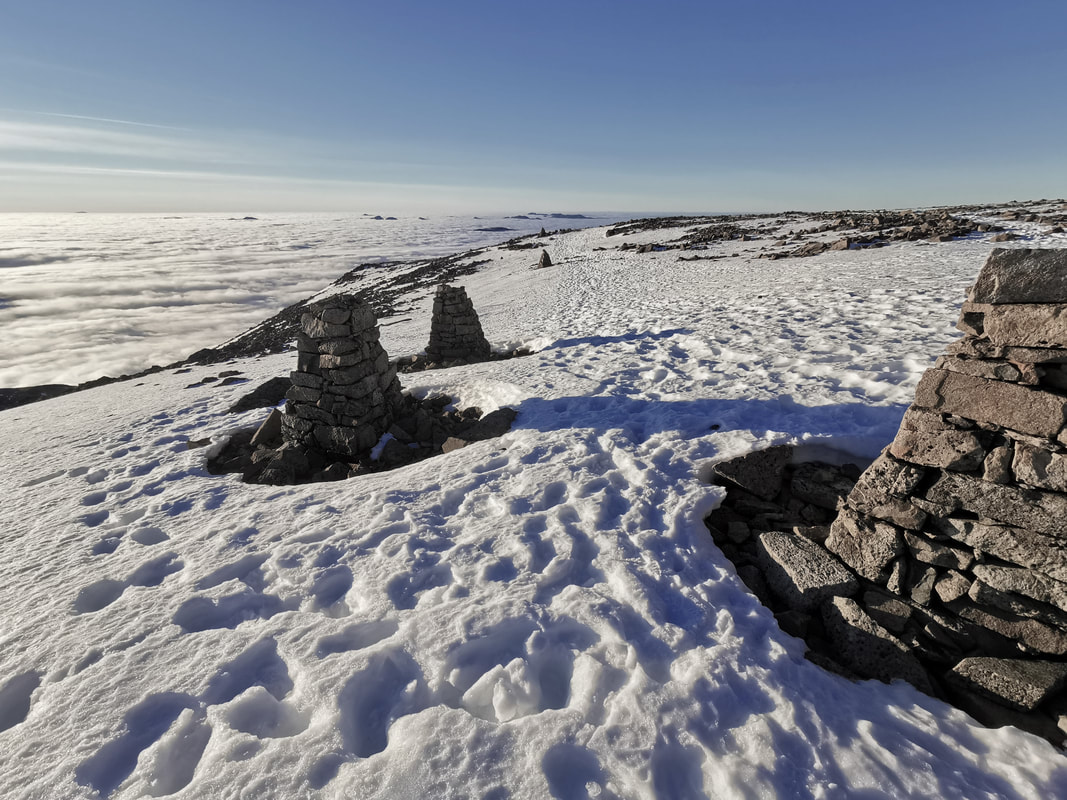 I have been walking and climbing on Ben Nevis and on all the mountains in this area for 28 years, and some of my scariest moments have been while navigating off the summits. When you are walking in a whiteout, you can not see what is in front of you at all. You are in a complete white room with no contrast between the ground and the sky. You can walk off a cornice and be falling before you know that it is there. When the only thing that will stop you walking off the cornice is your skill and practice in following a compass bearing and pacing the distance you are walking, you need to have total faith in your abilities. So, when you get it right, it is a very rewarding experience. If you would like us to help, you can join one of our guided walks up Ben Nevis this winter and we will show you what you need to know. Take winter navigation seriously. Most accidents in winter start off with a navigation error, and end in a trip, stumble or fall. Get some training and do lots of practice in a safe environment. Remember that you can turn around before you get into a situation that is beyond your skill set. 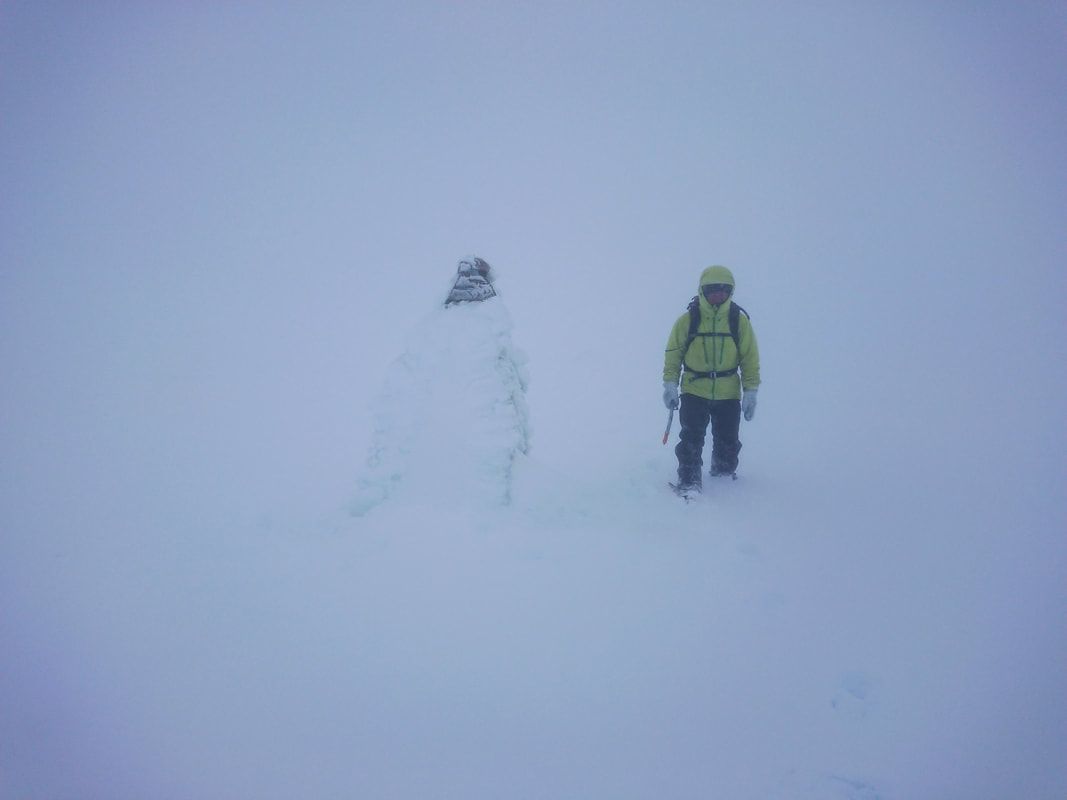 Let me tell you a story which, like all good stories, has something that you can learn from. In November 2019 early snow covered the tops of the mountains. It had been cold and windy for a while so rime was building on the highest crags, delicate feathers of ice like white ferns growing straight out of the rock. Everything above halfway on Ben Nevis was looking white and wintry, and a rare calm, dry and cold day was forecast. But, typically, I had not been sufficiently organised to find a partner to go climbing with. Instead, I grabbed some gear in a rush feeling the usual desperate urge to make the most of a good day. I wasn't at all ready for winter, my crampons and ice axes were still in the box where they had been dropped at the end of the previous season. So, I thought I would do something very familiar, a route that I know well and that is always a wonderful climb, Tower Ridge. I have been up and down Tower Ridge many times in summer and winter, but I had never climbed it by myself in winter. The climbing is well within my grade, but the early season conditions did cause me to pause for a moment to consider what it would be like. A thin cover of unconsolidated snow would be of no use at all for the climbing, unlike the solid snow-ice that would be in place for much of the winter and well into the spring. Crampons feel wobbly and insecure when it is like this because crampon points push through to stand directly on the rock, the form of which is hidden from sight under the snow. So, I was determined to climb carefully and slowly. This would not be an attempt on any kind of speed record and to make sure I went slowly I took my drone to record some of the outstanding situations. This, of course, was quite a distraction at times so I ended up only filming easy bits of the climb! Strapping on my crampons for the first time that winter was a great feeling, but it also brought a vague memory that I couldn't quite place. Stepping onto the summit was as wonderful as it ever is. The weak winter sun only just shone through the thin veil of clouds and didn't even have the warmth to melt the delicate rime ice from the rocks. It was a perfect day for hard mixed climbing but I had the whole of the North face to myself, so it seemed. As I unstrapped my crampons the fleeting memory came back to me. Right at the end of the previous winter I found that I had broken one of the crampons through the main body of the front section. This doesn't happen often and is not something that you can repair. Despite this, I just put my crampons back in the box and forgot about it. Not wanting to take my sharp new crampons out on an early season mixed climb I reached for an old set, forgetting that they were broken. Thankfully they stayed on my boots for the whole climb (which is more than I can say for a couple of pairs of not-broken crampons I have used!). So, the something to learn is of course that now is the time to get out all your winter gear and check it before you are in a rush to get out and use it. There is snow forecast for Friday and Saturday morning, the first few winter climbs have been bagged already in the Cairngorms, and a few people have already been caught out without winter gear. It's time to #ThinkWinter!  October is Mountain Leader month for us at Abacus Mountain Guides. We have been training and assessing Mountain Leaders for very many years and it's a real treat to be able to work on these courses. Helping new leaders through their qualifications and setting them off on the right path (please excuse the pun!) is so rewarding for us. Our courses have developed over the years as well, with the new leadership model from Mountain Training adding great depth and structure to this aspect of the course, and many things that we have found work well for people in the delivery and content of the courses.  The Mountain Leader syllabus includes leadership and decision making, route planning, navigation, meteorology, group management and security on steep ground, emergency rope work, stream crossings, hazards such as rockfall, flash floods and lightning, dealing with incidents and emergencies and improvised self-rescue. There's also expedition skills including camping, cooking and everything to do with looking after people at a remote wild camp. We often do some night navigation but that's just to do some poor visibility navigation. On assessment, if it is misty all day we don't need to do any night navigation!  There's a strong input on environmental knowledge on our courses, everything from geology and geomorphology, to botany, land management, history, Gaelic in the landscape and the physical, mental and spiritual benefits of walking in mountains for us all. To help people prepare for their assessment we have put together a range of resources for candidates to utilise. These are available for everyone and there are resources on navigation, the weather and route planning, as well as blogs that we have written on all sorts of environmental topics and a short video about the rope work. It's all here - https://www.abacusmountainguides.com/smlresources.html 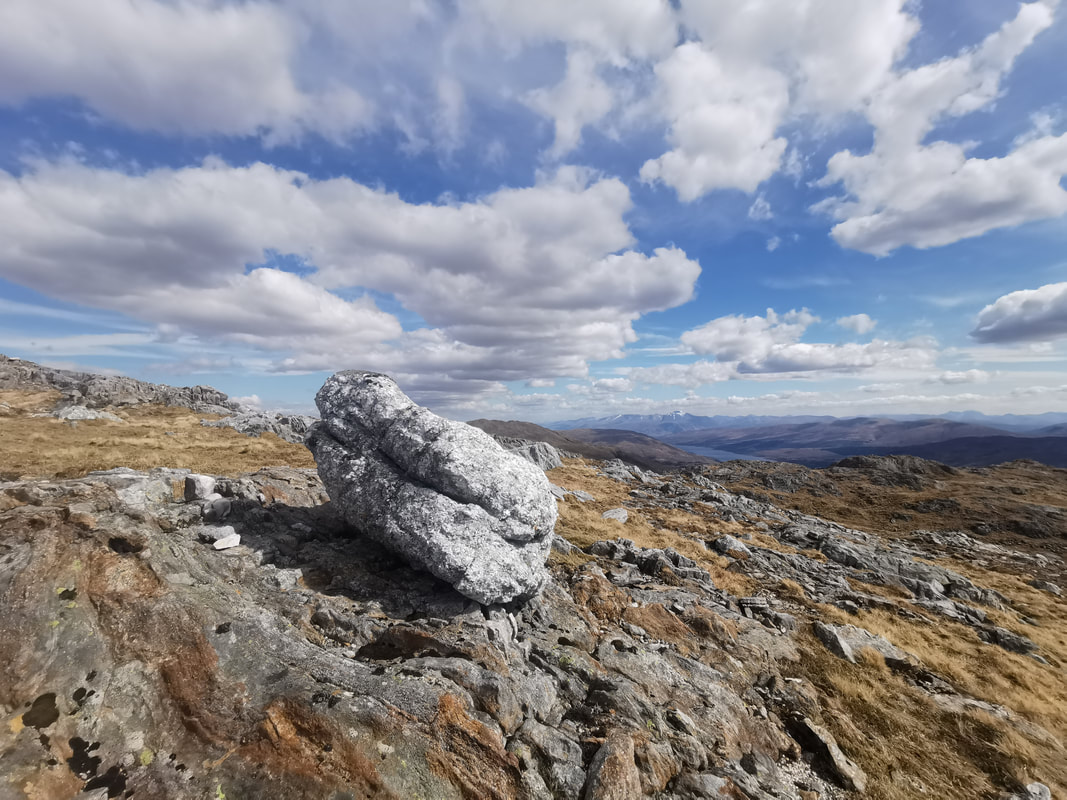  Just two weeks ago I was in the Cuillin on Skye with summit temperatures of 16 celcius and dehydration was the biggest problem that we faced. This week was not the same for Alastair and Ali! This week there was more chance of getting washed away in a stream than of dehydration, and the conditions were described as disgusting! Lots of rain, very strong winds and summit temperatures just a couple of degrees above freezing made it very challenging indeed. Despite this, Alastair and Ali manage to visit all nine Munros on the ridge over three days. This a great achievement given the weather. When the rocks are wet it is so hard to move quickly and efficiently over them. There is lots of grippy gabbro but there is also plenty of polish and lots of basalt which is very slippery in the wet. So, a huge well done to Alastair and thanks to Ali for working around some pretty horrific conditions.  The mountains of the Cuillin are composed of solid rock with very little vegetation cover at all. This means that rain runs off very quickly, streams rise incredibly fast and getting into or out from the coires can be impossible. Very careful thought needs to be put in at the planning stage to make sure that you don't end up facing a serious stream crossing. Even the small streams quickly become impassable with water run-off.  The autumn is a bit of a lottery of weather - you never really know what you'll get. So, be prepared for everything from warm sunshine to cold, rainy and windy. Fixed plans are not ideal, instead it's best to be open minded and prepared to think outside the box sometimes. We have had some wonderful adventures in the autumn, made even better by the changing colours in the landscape and the lack of midges! And we that late autumn means snow and frozen ground - winter is on the way!  Join Protect Our Winters and SEND IT for climate! The UK government committed to reaching net zero emissions by 2050, but even according to their own climate change committee we’re not on track, and this affects everyone. The next elected UK government must make policy commitments that get us back on track to net zero. Policy commitments start with party manifestos, and you have the power to influence those manifestos! We need the entire UK outdoor community to send a virtual postcard to stand up for the places we love! POW have taken care of the hard part - POW’s postcard outlines the policy commitments needed to get us back on track to net zero. All you need to do is fill in the blank sections. Send a digital postcard and get the UK back on track to net zero. Want to send a physical card? Pick one up from select Ellis Brigham shops and we’ll send them for you. Send a postcard and get the UK back on track to net zero 👇 https://protectourwinters.uk/send-it 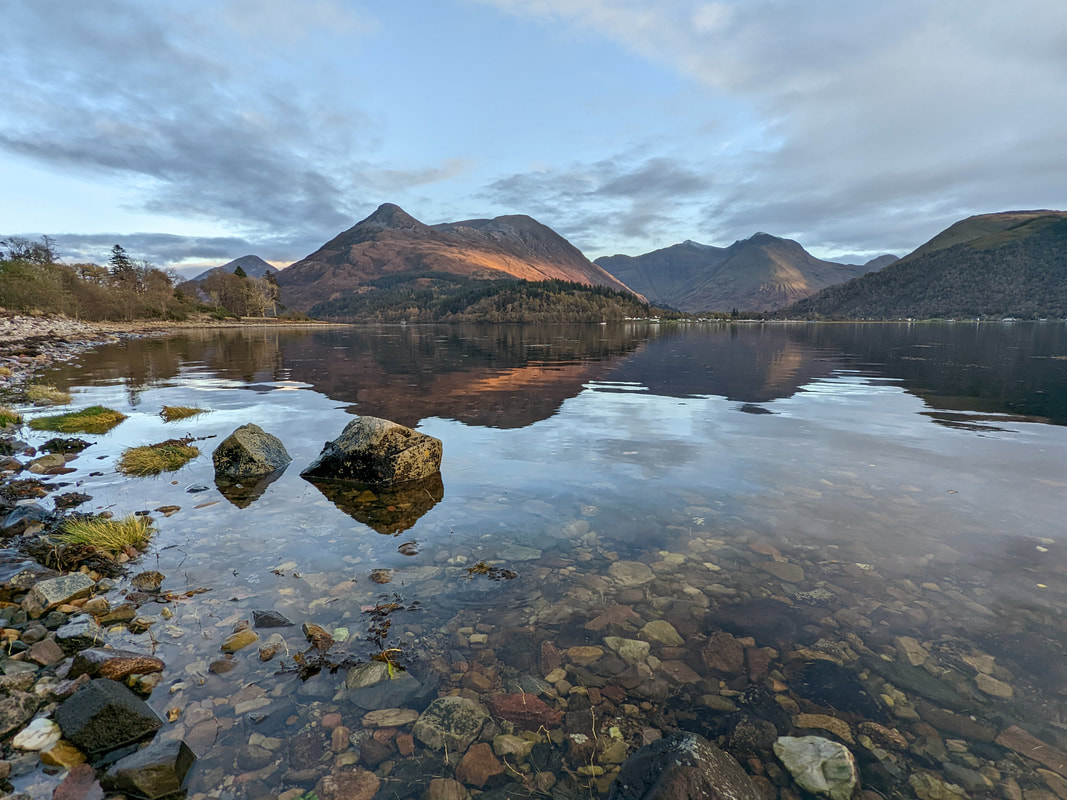 Mountain Guiding and the Climate Emergency Members of the British Association of Mountain Guides have the privilege of climbing and skiing in mountains all around the world. With the highest worldwide mountaineering qualification, we enable others to get the most out of these beautiful places. The increasingly obvious effects of climate breakdown are very apparent to us. We see them first hand in the shorter winters with less reliable snow cover for skiing and ice climbing in the UK and in Europe, and in the shrinking glaciers and very hot conditions now found in the Alps in summer. Mountains are our passion and our workplace, but it can be difficult to know what action to take to help protect them. So the British Association of Mountain Guides is delighted to announce its partnership with Protect Our Winters. Protect Our Winters helps passionate outdoor people become effective climate advocates to achieve systemic solutions to climate change, protecting our world today and for future generations. Through Carbon Literacy Training we will gain a better understanding of the climate crisis. Accredited by the UN-recognised Carbon Literacy Project, these courses are tailored to the outdoors community, making them super relevant to us. We will influence decision makers by supporting Protect Our Winters campaigns. Campaigns focus on renewable energy, electric transportation, green finance, and a managed decline of fossil fuel extraction. Protect Our Winters and British Association of Mountain Guides have the passion, information, and resources to make a difference now. |
AuthorMike Pescod Self reliance is a fundamental principle of mountaineering. By participating we accept this and take responsibility for the decisions we make. These blog posts and conditions reports are intended to help you make good decisions. They do not remove the need for you to make your own judgements when out in the hills.
Archives
March 2024
|


 RSS Feed