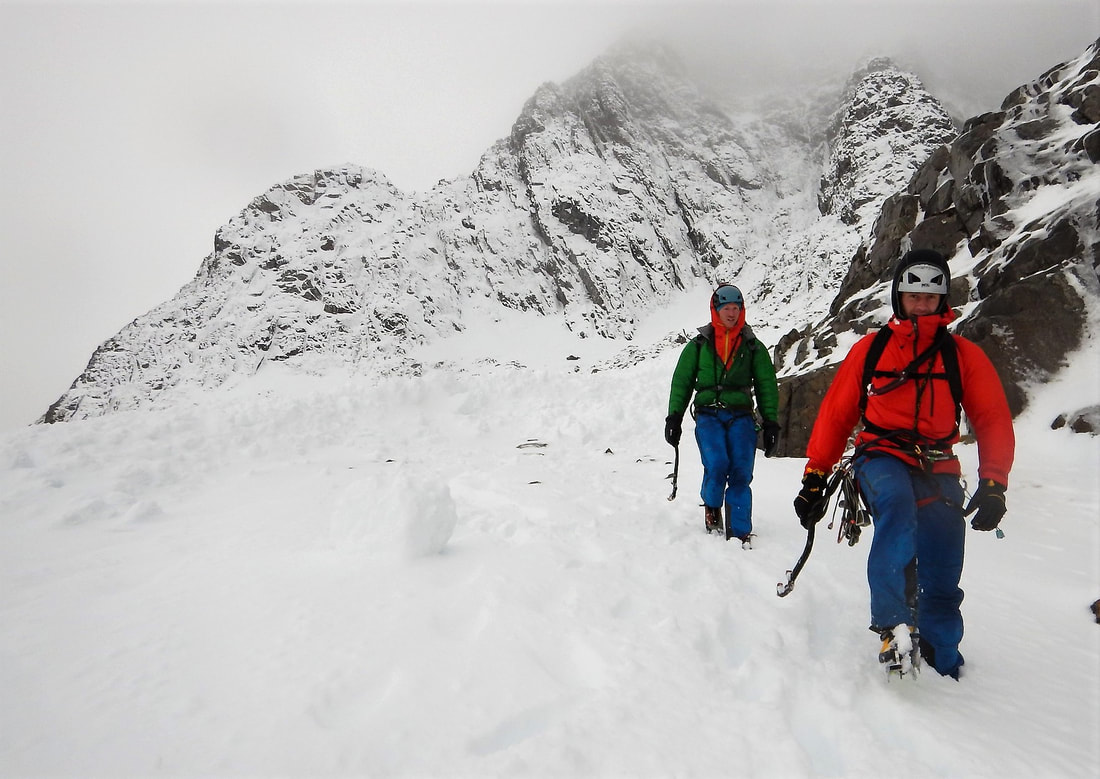
We have had unusually strong and persistent easterly winds for a week now bringing fresh snowfall and creating deep accumulations of snow and a High avalanche hazard in some areas. It has been a very difficult week to get out and do anything safely, so it's a good time to brush up on some more planning skills.
In Scotland, we are super lucky to have the Scottish Avalanche Information Service giving us detailed information on snow conditions and the avalanche hazard. SAIS is funded by Sport Scotland which itself is a Scottish Government funded organisation. The Scottish Government considers this to be an essential service for walkers, climbers and skiers. The people delivering the service are incredibly experienced and highly trained observers and the way the reports are presented is world class. We have an amazing resource here, make sure you know how to use it properly. Pull up the avalanche forecast in a new window and have a map to hand while you read through this. 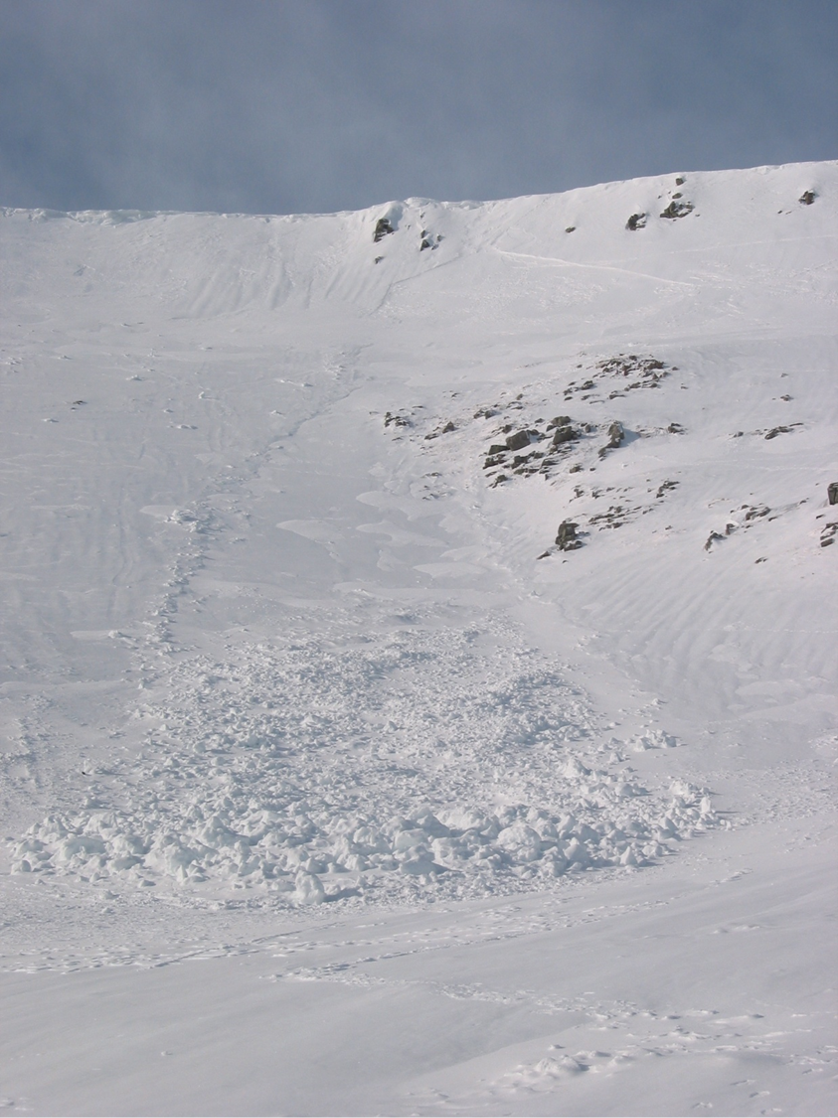
We need to build a picture of the snow cover and its history. Start by reading the Weekly Snowpack Summary, top right of the page. This describes the previous week's weather and what happened to the snow. It will give some background to what to expect on your day out, where the snow is, how the weather has changed it, and what hazard there is in general.
Have a look at the blog posts. On the right of the page, under the Weekly Snowpack Summary, you'll find the last few blog posts rom SAIS observers. These have photos taken while they were out working as well all sorts of points of interest. A photo of where you are going, or somewhere close to it, is really valuable so you know what to expect when you get there. With a bit of an idea of what snow cover there is and its history, we now need more detail. You'll get this in the Observed Avalanched Hazard tab to the right of the Avalanche Hazard Forecast. This is exactly what it says, observed avalanche hazard, i.e. actual data not a forecast. The forecasters go to lots of different places on their day out, making observations of the snow and checking the hazard. This is observed data, the detailed starting point on which the forecast is based. It is occasionally different to what was forecast the day before. Lastly, read the forecast. Read the text and take time to read the details on the avalanche hazard rose. Check the altitudes of the start of the snowpack and where the higher hazard is, as well as what the hazard level is.
So, what does it say? The avalanche hazard rose (AKA the wheel of fortune or the avalanche piechart) tells us where the hazard is and what level of hazard it is. Each aspect of the mountain is represented at different altitudes all the way up to the highest peak in the area of the forecast. You can work out which aspects of slope have less avalanche hazard and stick to those. You need to know what the hazard level is in each area too.
The avalanche hazard scale is available to see by clicking just above the avalanche hazard rose. Take time to read the descriptions carefully and really understand what each level is. The words have been very carefully chosen and developed to give us the information we need in a practical, usable way. The hazard levels described by "Low", "Moderate", "Considerable" and "High" are very specific levels, not just vague adjectives. The descriptions talk about natural avalanches and human triggered avalanches. Natural avalanches are started by a natural trigger such as a rise in temperature or rapid accumulation of snow. Natural avalanches can be triggered above you and sweep down onto you. Large natural avalanches can travel below the area marked on the avalanche forecast rose. It is important to take notice of avalanche paths in case you are in a run-out zone when a natural avalanche occurs. You might be on relatively secure slopes but what is above you might not be secure. Human triggered avalanches are what normally catch people out though. Most people trigger the avalanche that they get caught in. Triggering of an avalanche will occur if the slope is steep enough and if there is enough extra weight on the snow to act as a trigger. In a Moderate hazard, human triggering is possible, but not likely. It's reasonable to cross these slopes with some care. In a Considerable hazard, a single person load is likely to trigger an avalanche. Would you cross the road if you were likely to be hit by a car? Probably not, so don't go walking across steep slopes of this hazard level. Natural avalanches may occur, but are not likely. A High avalanche hazard says naturally occuring avalanches and human triggered avalanches will occur and they could be large or very large. Don't go near the red areas! How steep is steep enough? Anything more than 25° can avalanche, but the most likely angle for an avalanche is about 30° to 45°. Knowing how steep a slope is, is a useful skill to develop. You can start by using a clinometer on your phone or compass, or the tool in the Be Avalanche Aware app from SAIS. 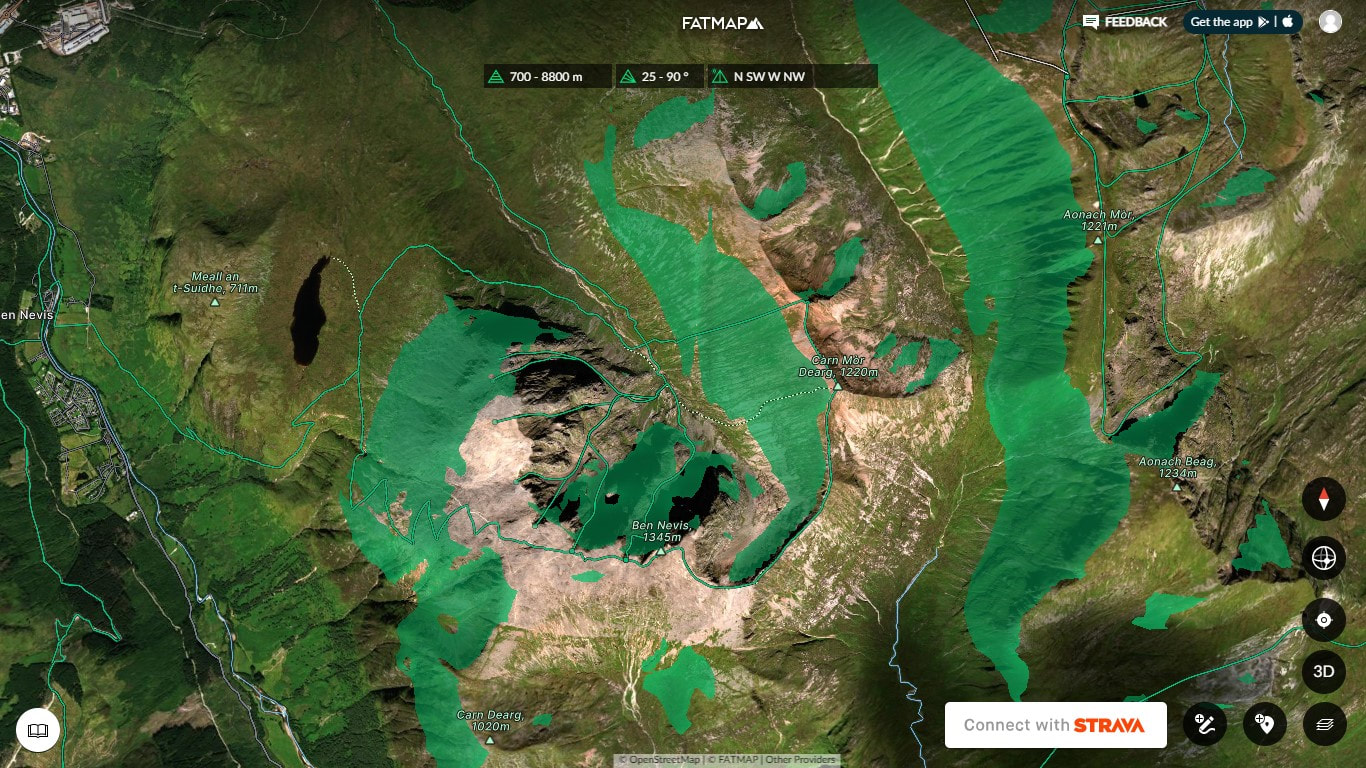
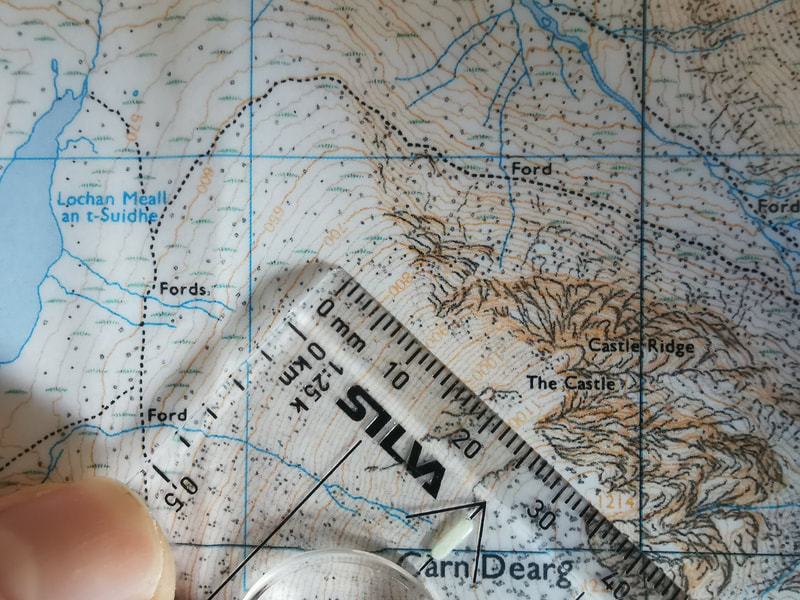
It's time to start looking at a map. We need to transcribe the information on the avalanche hazard rose to the slopes we see on the map. We need to look at the contour lines and work out the aspect of slope and its gradient.
If you want an easy way to do this, use Fat Map. You can add a layer to the satelite image to show areas above a particular altitude, on particular aspects and gradients. In the image above I have selected SW, W, NW and N facing slopes above 700m and steeper than 25°. The green shaded areas in the image relate to the areas of considerable avalanche hazard in the forecast above. You can do the same by looking at the contour lines. The easiest thing to do is work out areas above a certain altitude by finding that contour line. If you stay below this altitude and away from run-out zones, you will be pretty secure. The aspect of slope can be determined by considering a line perpendicular (at right angles) to the contour lines, pointing down the slope. See the image below. We can also work out the gradient of a slope from the contour lines. On an OS map, the index contour lines (the thick ones) are 50m apart vertically. 50m horizontally on a 1:25k map is 2mm. So if the index contour lines are 2mm apart, the slope is 45°. If the index contour lines are 4mm apart, the slope is just under 30° (26.6° to be exact). I'll spare you the trigonometry! 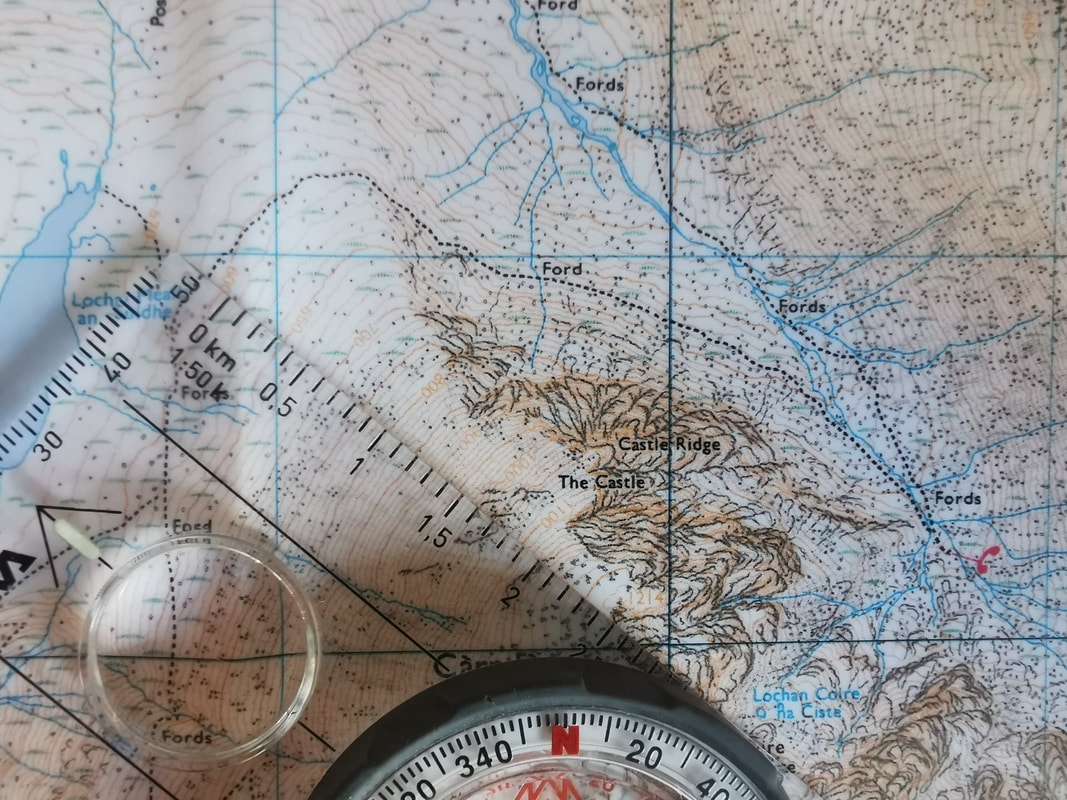
Looking at the forecast above, a good route to choose might be Castle Ridge on Ben Nevis. It faces east and the forecast says that east facing slopes at all altitudes will have a low avalanche hazard because the wind has scoured off all the soft snow. So far, so good.
Now think about how to get down. The common descent is down towards Lochain Meall an t'Suidhe. The picture above shows that this slope faces north west and the top of the climb is at 1050m. NW slopes at 1050m have a considerable avalanche hazard forecast for them all the way down to 700m. So, if this slope is steep enough, it is one to avoid. The pictures below show how steep it is. Between the 1000m contour and 950m contour the gap is just over 2mm. So the slope here is close to 45°. If you want to be super accurate, the gap is 2.5mm on the map which is 62.5m in real life. Doing the trigonometry gives a slope angle of 38.7°, just about perfect for triggering avalanches). Down at 800m to 750m the gap between index contours is 4mm making the slope angle just under 30° here, still of concern and to be avoided. So, descending this slope after climbing Castle Ridge is not a good option at the moment. It might be better to go over to the top of Carn Dearg, past Number Four Gully and down the Mountain Track since the slope angle is less all the way down here, the slope stays below 30° under the track all the way to the Red Burn crossing. However, check the gradient of the slopes going from the top of Castle Ridge up to Carn Dearg and decide for yourself if you'd be happy walking up them right now. 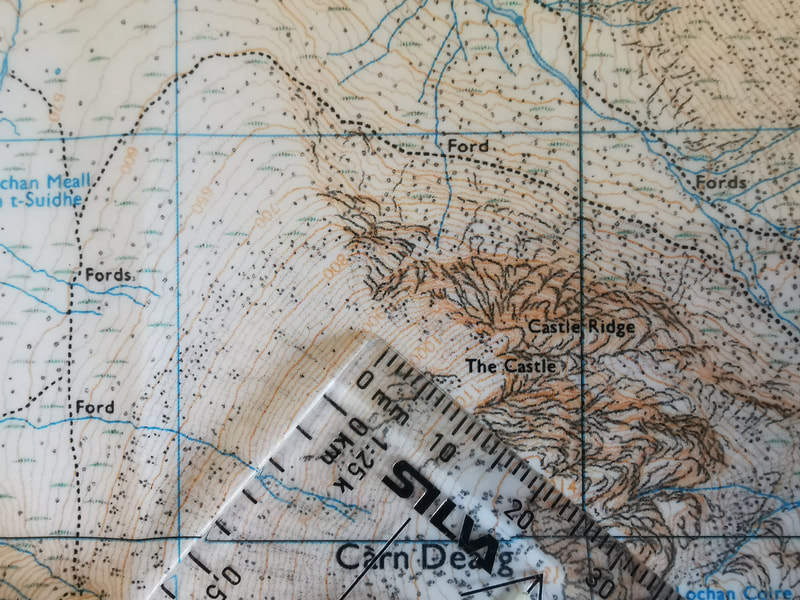
So, we can look at the avalanche hazard rose and read which slopes have an avalanche hazard, and how high the hazard is. We can then look at a map and work out what areas on the map to avoid. So, why do we need to read so much on the avalanche forecast instead of just looking at the avalanche hazard rose?
This is because the forecast is just that, a forecast. It is right most of the time, but sometimes it is not accurate because the weather forecast it is based on was not accurate. Sometimes we find an avalanche hazard in a different area or of a different scale to what was forecast and we need to be able to recognise this. If we build up a really good picture of what the snow is like first, we have a much better chance of noticing if the forecast is right or if it is slightly different to what we are seeing. 75% of the decisions we make in a day of mountaineering should be made in advance, based on the weather forecast, the avalanche forecast, our experience and ability level and those of the people we are with. We should think about these things first and choose a route based on them when we are not so easily influenced by what other people are doing or tracks we might see in the snow. Once we are on the journey, walking in to our objective, we should be observing and checking that what we see is in line with the forecast. Most of the time we will be able to stick to our plan, but about 20% of our decisions will be made based on what we see on the journey. By the time we are at critical decision making moments such as which gully to go up or which descent route to take down, we should be 95% sure of the decision before we get there. Being able to see is a very valuable thing. In good visibility we can look for signs that the avalanche forecast is accurate and we can see evidence of instabilities. We should be able to recognise areas where snow has been accumulating, and areas where it has been scoured away. A crucial skill is to be able to recognise windslab under our boots and to be able to spot windslab from scoured stable snow ahead of us. It's nice to be able to see cornices and evidence of recent avalanches, areas of safety and areas threatened from above. If you can't see because you are in the cloud and you don't know the terrain intimately, work on the basis that the avalanche hazard is one higher than the forecast. If it is a Moderate, work on the basis that it is a Considerable, and make decisions appropriately. Many people get caught out by quite small avalanches, small areas of accumulated snow that are just big enough to avalanche and send people tumbling. Big corries full of snow are easy to see, but small areas of windslab in random locations can catch out anyone. The text on the forecast describes some of these locations. Cross loading of gullies and small slopes occurs when a wind blows snow across a slope allowing gullies in the slope to catch snow in the sheltered side of the gully. The avalanche forecast might say that west facing slopes are secure, but in that west facing slope there will be undulations, bluffs and gullies that can catch small areas of windslab and cause individual areas of avalanche hazard. Being avalanched in Scotland is not an option. Burials are quite rare but injuries due to tumbles and the trauma caused by hitting rocks are often severe. We have a world class avalanche information service - make sure you use it properly and fully to help make good mountaineering decisions. 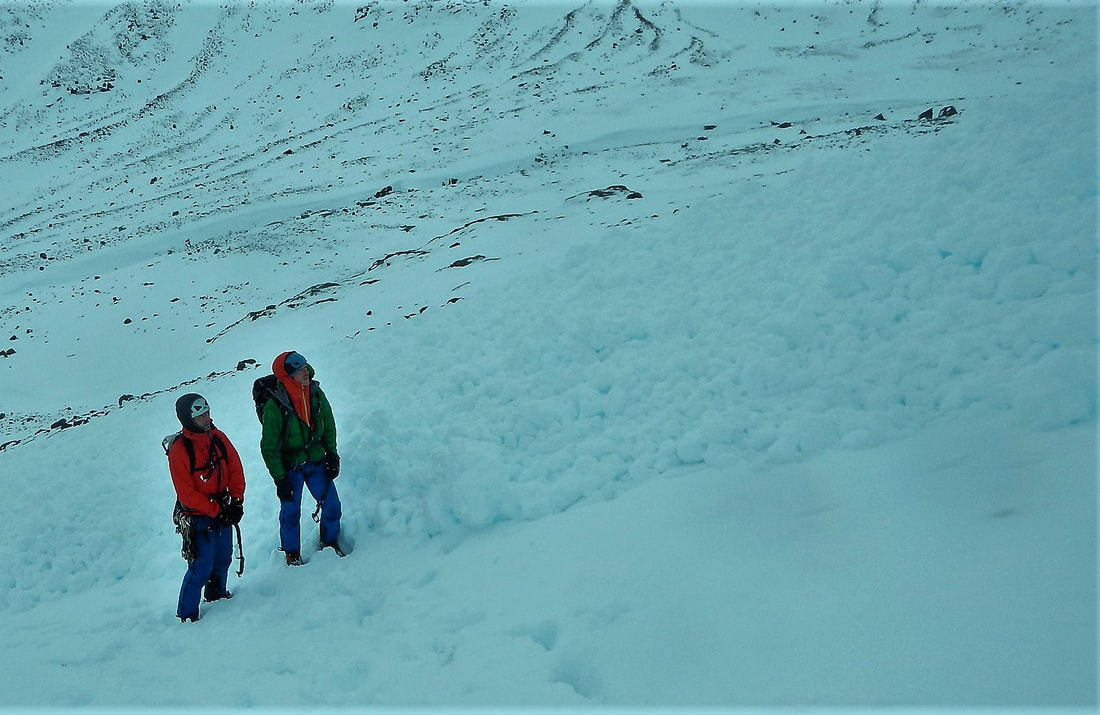
An avalanche in Observatory Gully that occurred while we were climbing on Douglas Boulder.
0 Comments
Your comment will be posted after it is approved.
Leave a Reply. |
AuthorMike Pescod Self reliance is a fundamental principle of mountaineering. By participating we accept this and take responsibility for the decisions we make. These blog posts and conditions reports are intended to help you make good decisions. They do not remove the need for you to make your own judgements when out in the hills.
Archives
March 2024
|
 RSS Feed